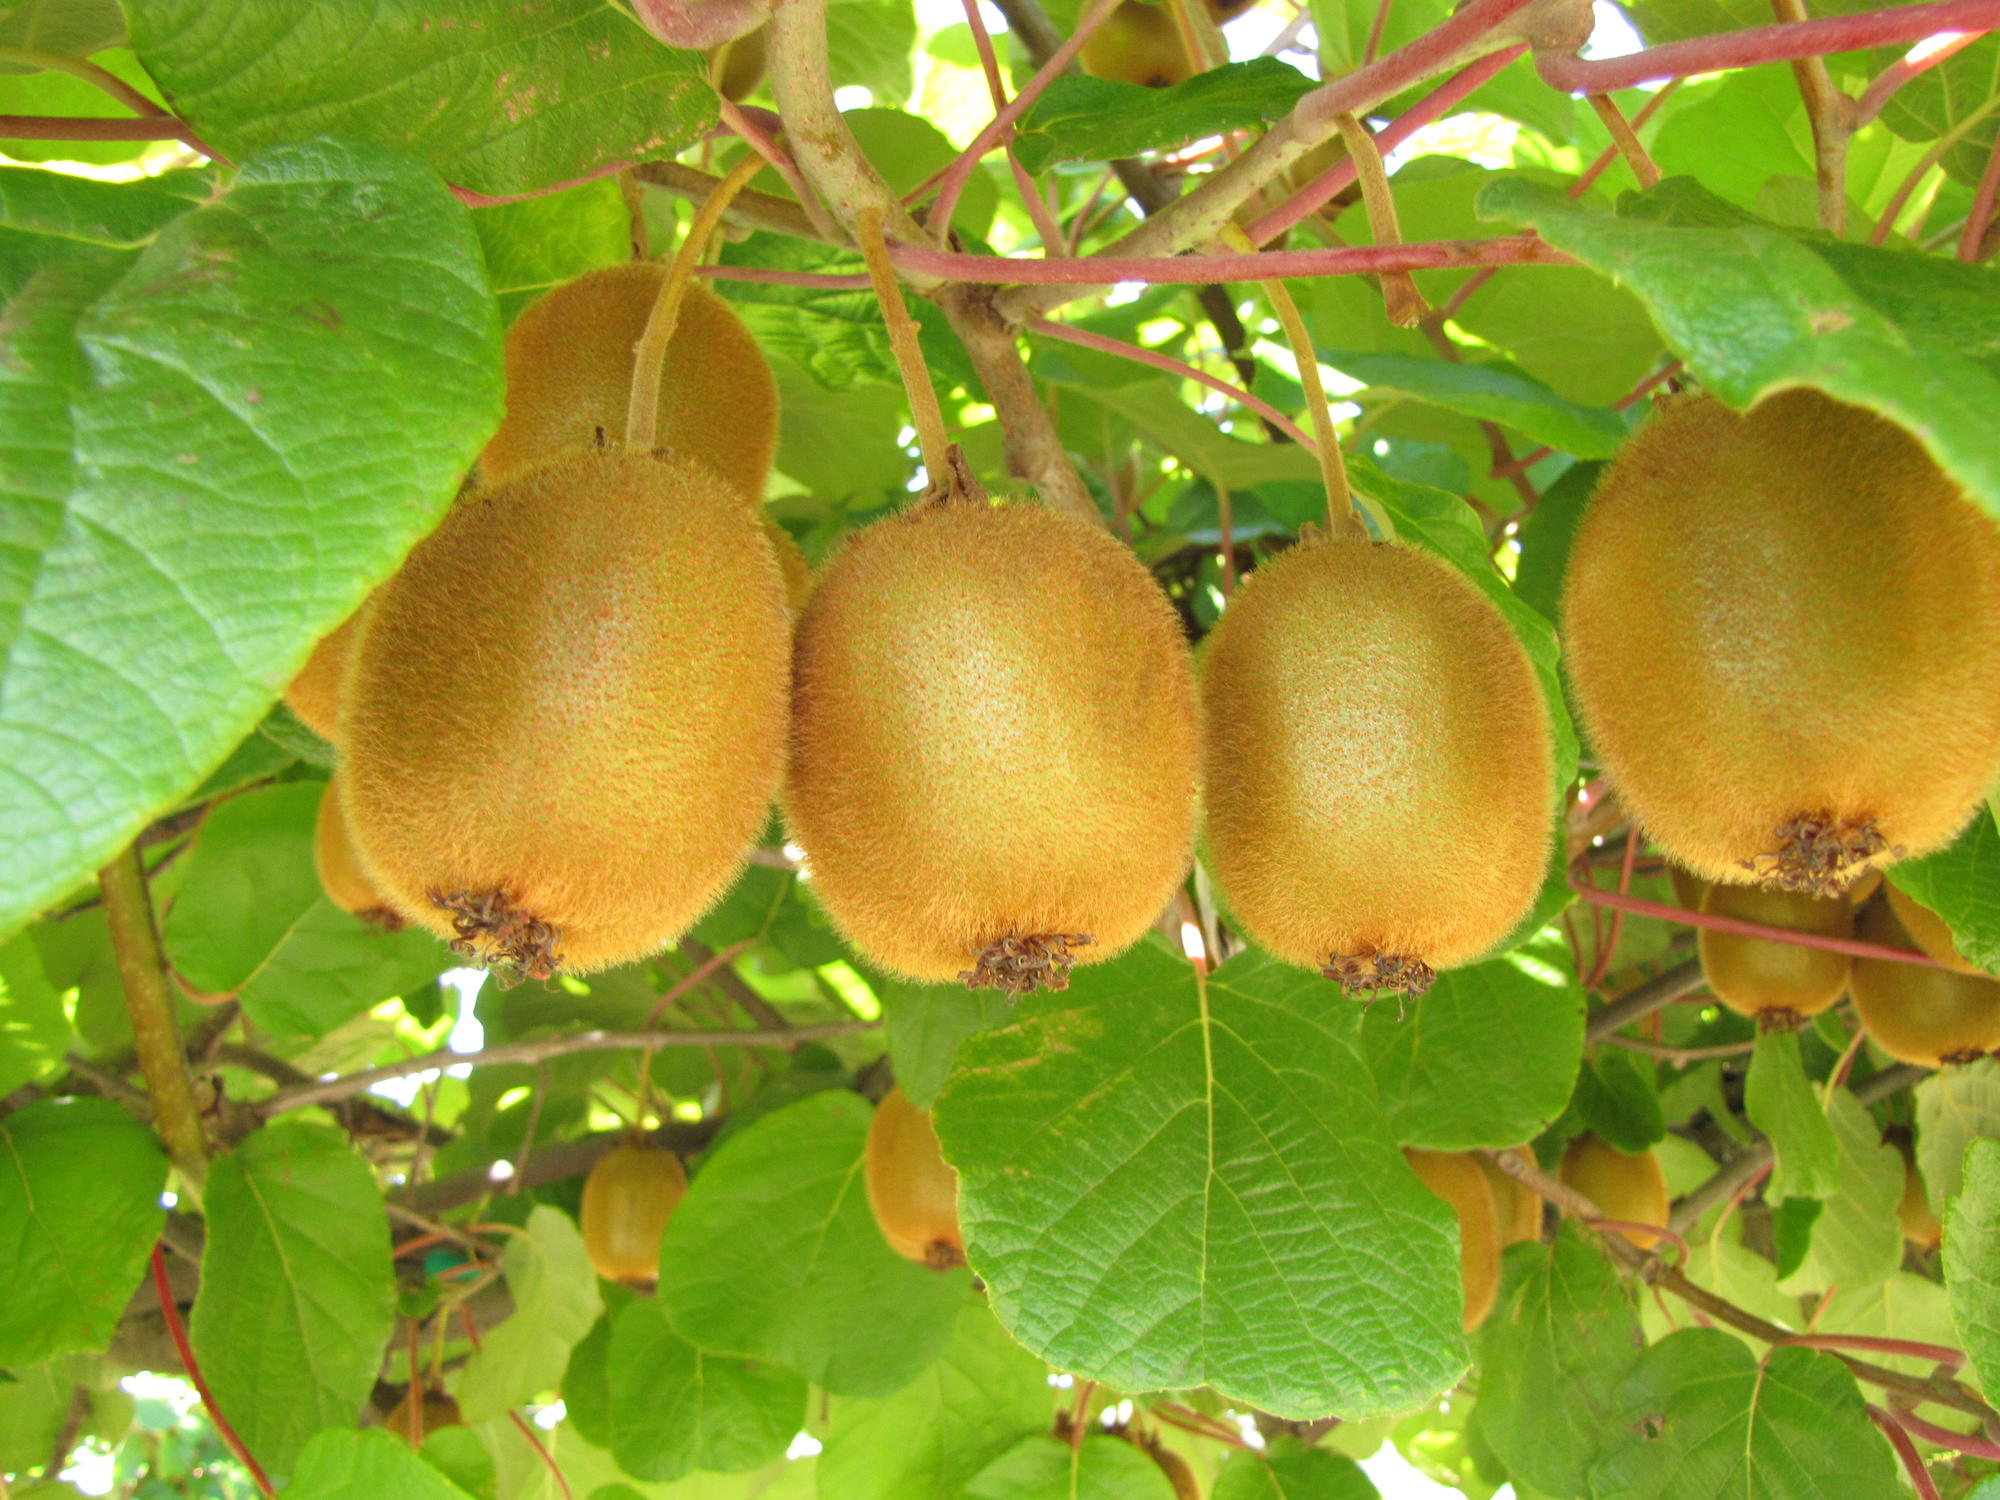
You may know kiwifruit by what you see in the grocery store: a fuzzy brown egg-shaped fruit with green or golden flesh (Figure 1). Other species of kiwifruit bear bite-sized fruit with smooth, edible skin (Figure 2). Which type you can grow in your home garden depends on the climate in your region.
Kiwifruit plants are dioecious, meaning there are separate male and female plants. While male plants do not produce fruit, they are essential for pollination and fruit production on female plants. It is best to plant a male and female vine of the same species. There are some self-fruitful kiwifruit cultivars that don’t need male-pollinizing vines. But even in these cultivars, adding a male vine of the same species can increase fruit size through cross-pollination.
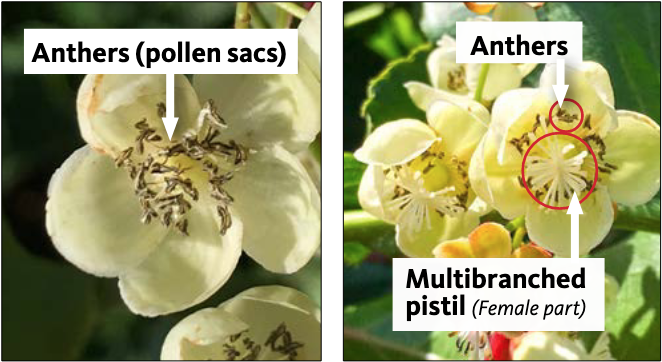
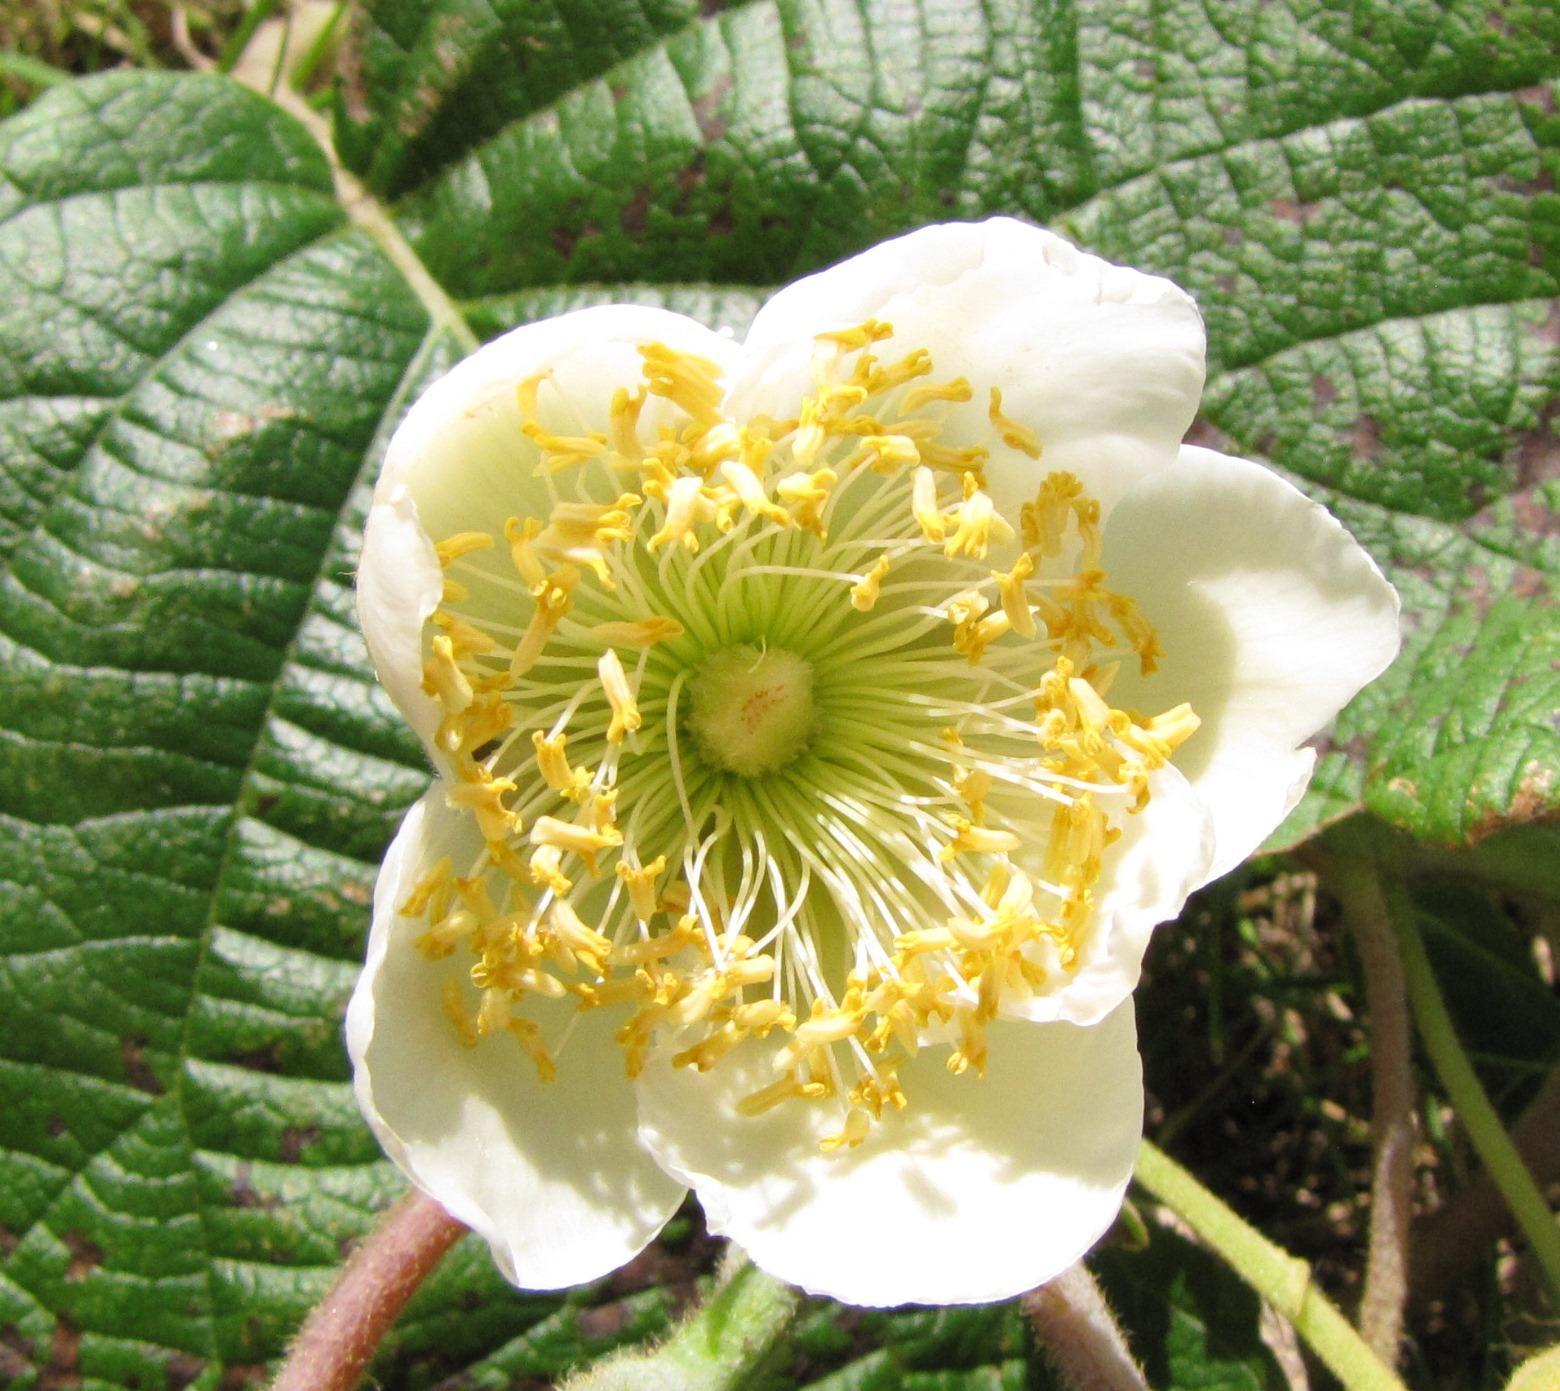
Male and female vines in most species can only be distinguished from each other at bloom. The flowers on male vines only have pollen-producing anthers (Figure 3A). Female flowers have anthers that do not produce viable pollen. You can tell them from male flowers by their central, multibranched pistil (Figure 3B). The pistil develops into the fruit after successful pollination and fertilization. While flower size varies among kiwifruit species, you can distinguish male from female flowers by the pistil.
Sometimes nursery plants are mislabeled. Gardeners will think they are buying a female (fruiting) and a male vine, but they get two males or two females. No fruit will be produced on the female vine without a male. To be sure, check the gender of each vine at bloom (Figures 3, 4 and 5).


Kiwifruit plants are vigorous climbing vines. They are native to eastern Asia from very cold to tropical climates, depending on the species. Several of these species are available from nurseries. Some have been developed to produce fruit, and others are ornamental.
Most people are familiar with the green-fleshed, brown-skinned, “fuzzy” kiwifruit (Actinidia deliciosa) (Figures 2 and 6). This type is only adapted to warmer sites in western Oregon. It’s not winter cold hardy enough for most other regions.
The golden-fleshed, brown-skinned kiwifruit (Actinidia chinensis) that is also found in many grocery stores (Figure 7) cannot be grown in the home garden in any region of Oregon.
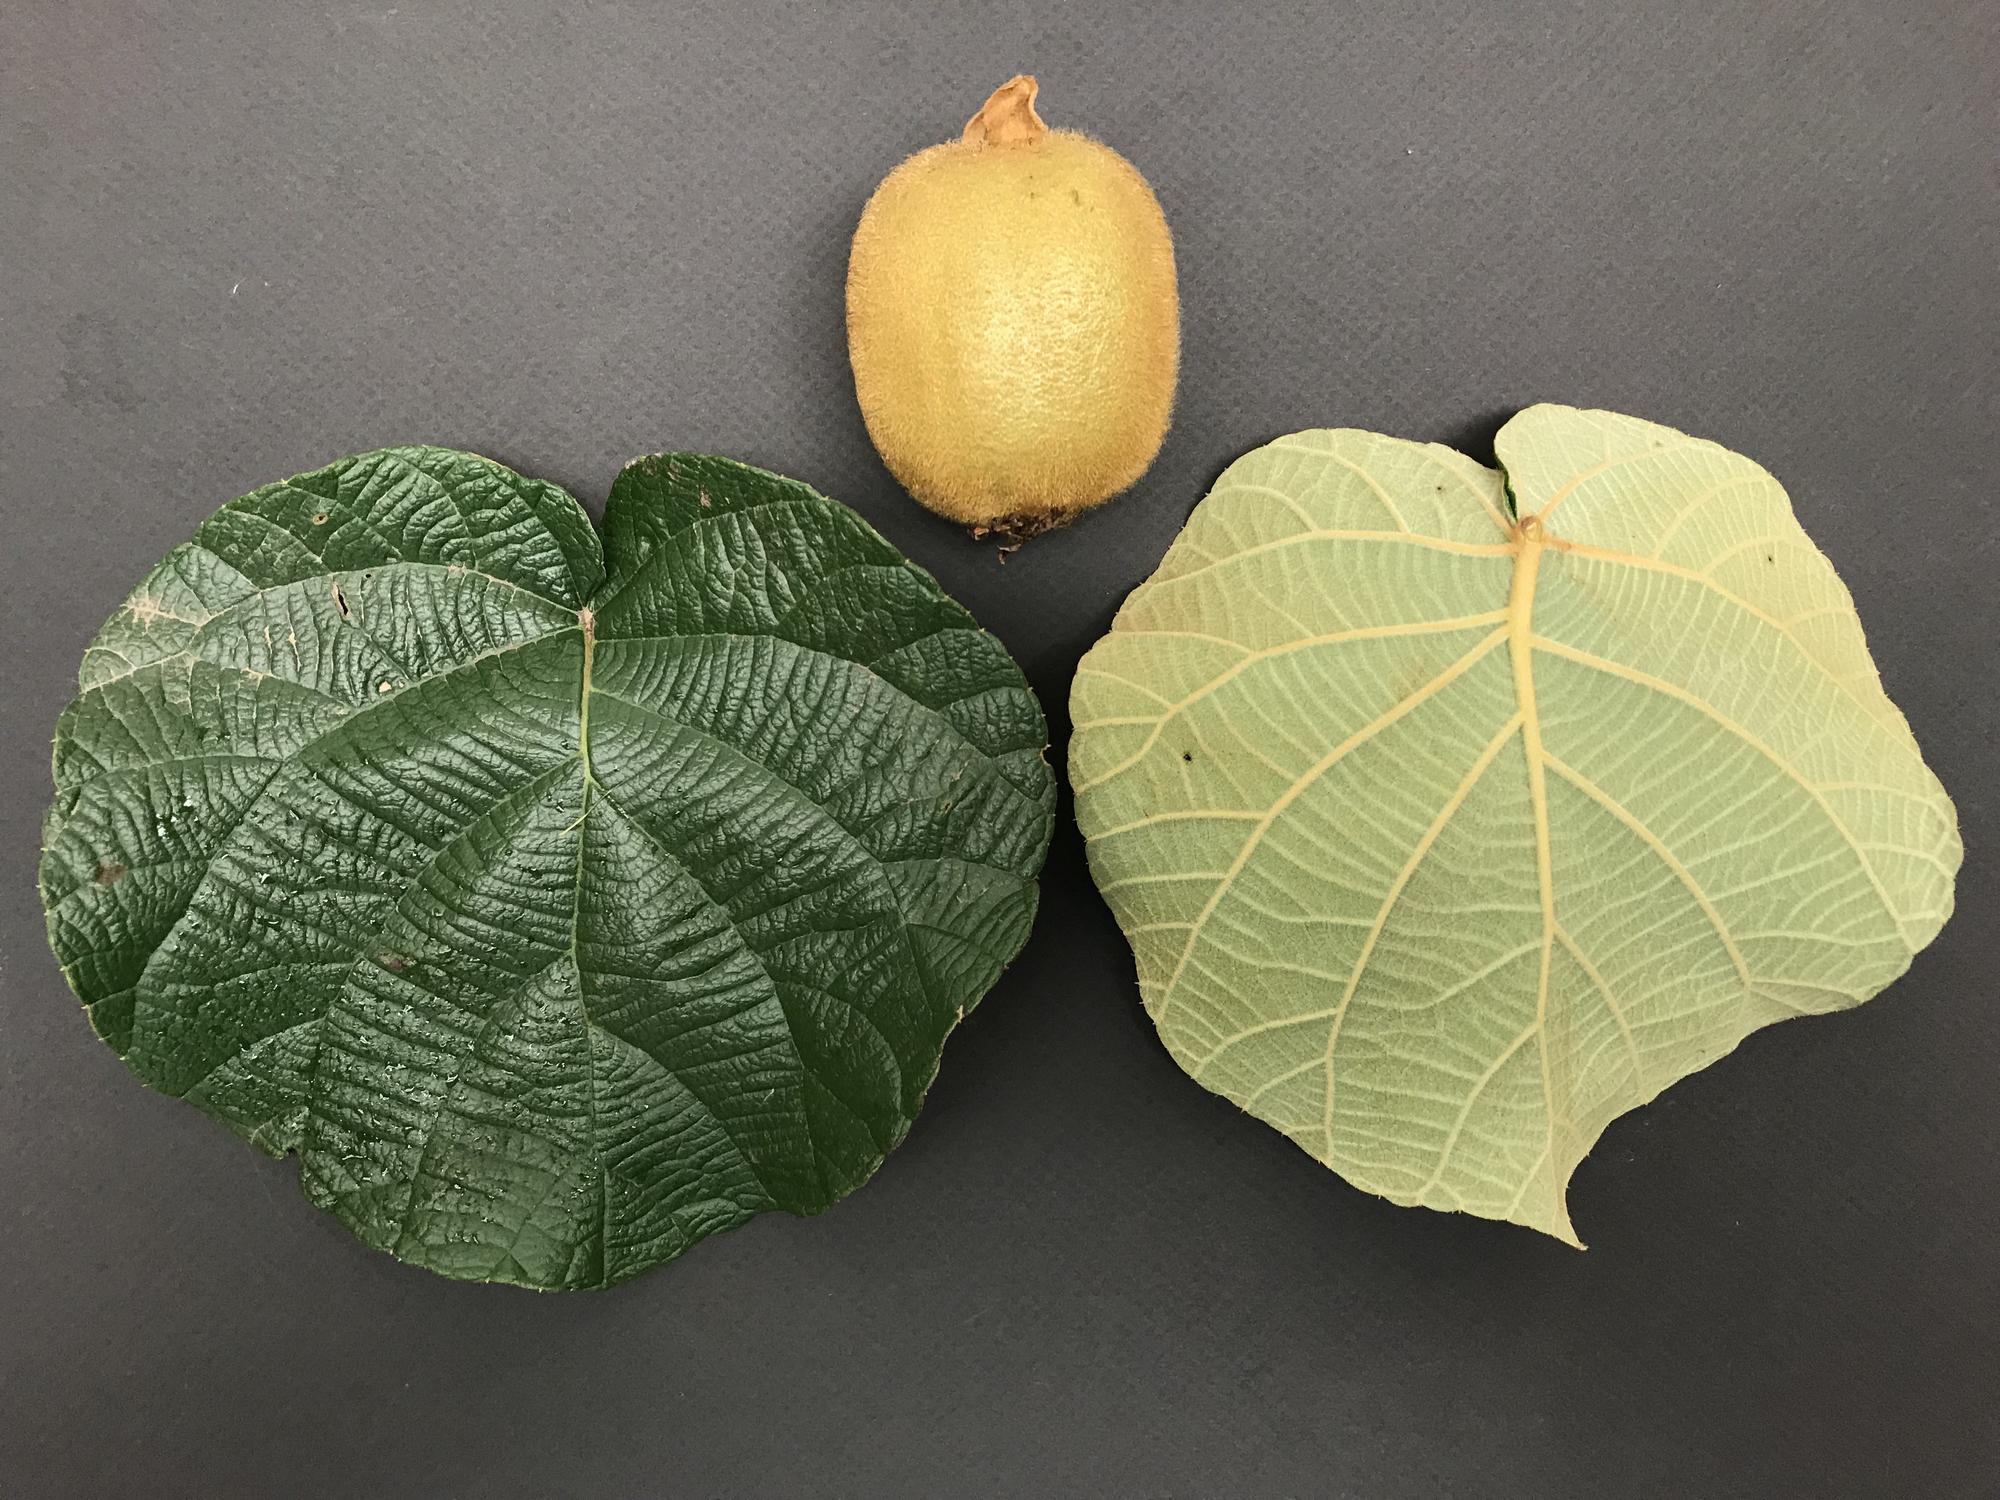

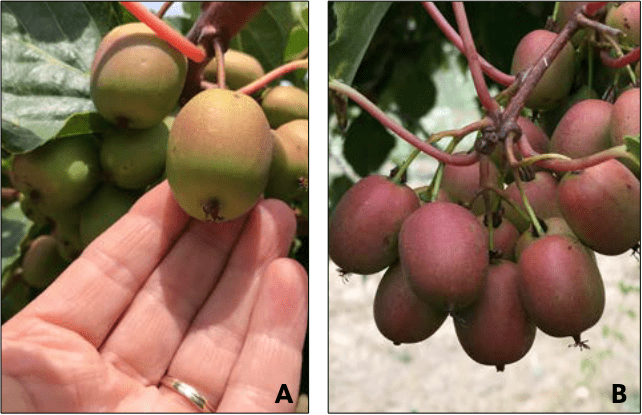
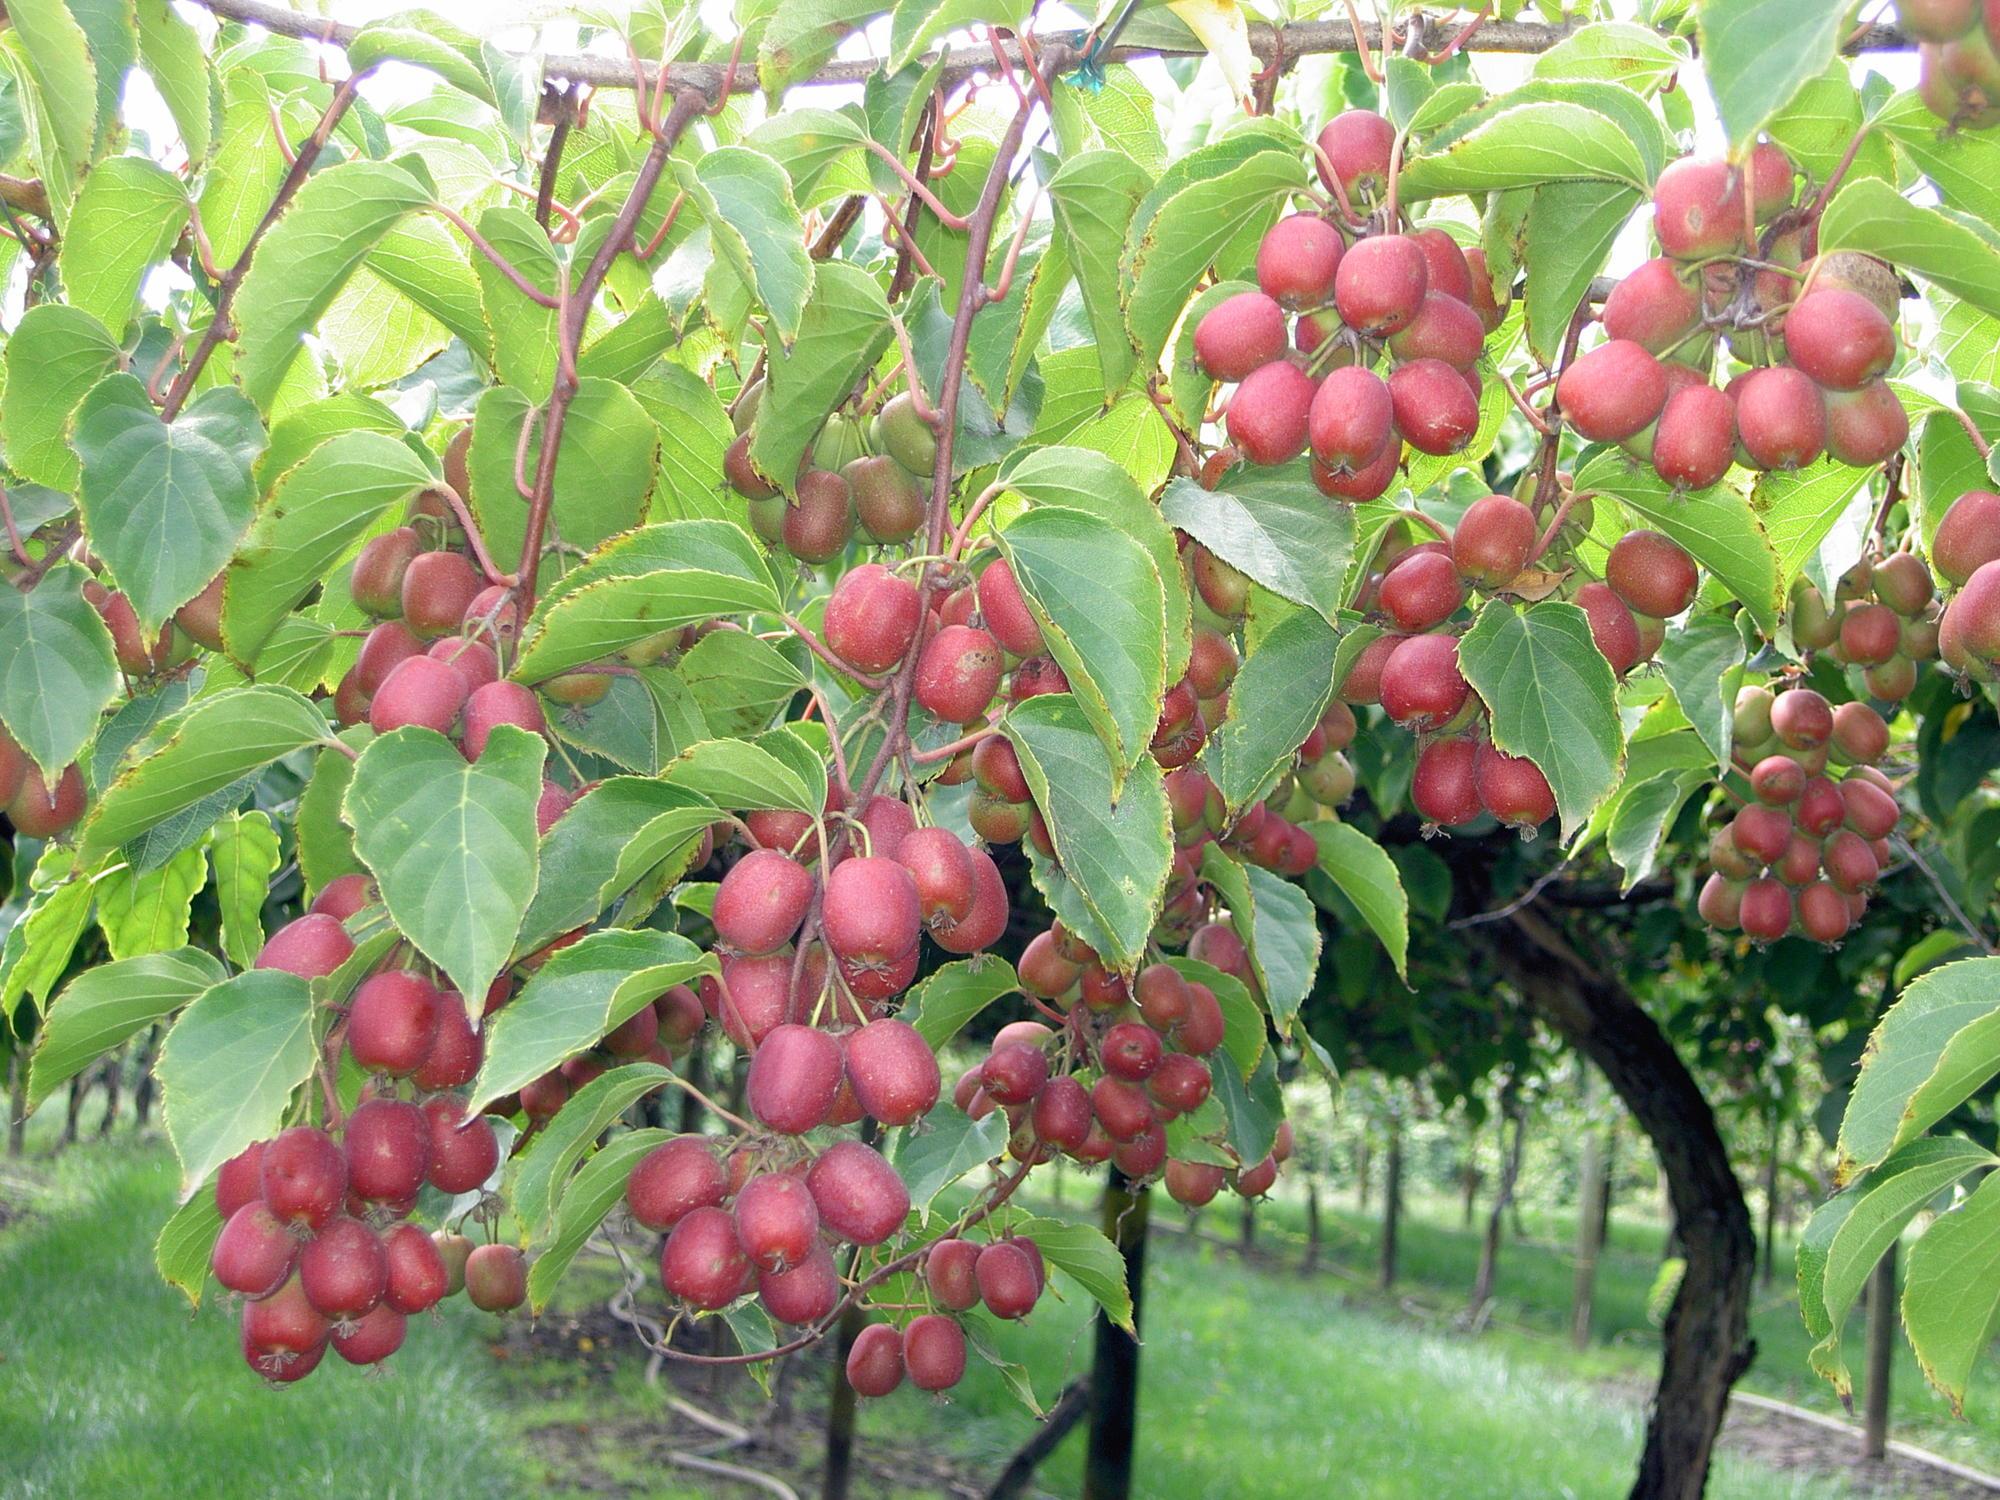
However, the small-fruited, smooth-skinned kiwifruit (Actinidia arguta) is adapted to most regions of Oregon. This species was once marketed as hardy or baby kiwifruit but is now more commonly called kiwiberries (Figure 2). The most common cultivars or cultivated varieties of kiwiberries have green or red flesh (see “Cultivars,” Table 1). The Arctic kiwifruit (Actinidia kolomikta) produces smaller and less flavorful fruit than Actinidia arguta in our region. However, Arctic kiwifruit are the most cold hardy cultivars available (see “Cultivars”).
The male Arctic kiwifruit is also commonly grown as an ornamental for its pink variegated leaves.
Flavor varies tremendously among cultivars. Kiwifruit are one of the best natural sources of vitamin C with up to 430 mg per 100 g fresh weight. (An orange has about 70 mg per 100 g fresh weight.) Kiwifruit are also high in oxalic acid. Often people susceptible to kidney stones need to avoid eating fruits and vegetables high in oxalic acid.
Kiwifruit cultivars
Choose a species and cultivar adapted to your region. There are many cultivars available, but a limited number have been tested and confirmed to grow well in Oregon. Kiwifruit are relatively easy to propagate using hardwood cuttings. Wood removed at pruning can be used to make and share cuttings (see “Planting”).
Only one fruiting cultivar of green-fleshed fuzzy kiwifruit is commonly available for the home garden: ‘Hayward’ (Table 1). ‘Hayward’ and the required male (Actinidia deliciosa) are not adapted to the colder regions of Oregon (lower than Zone 6). The trunk and fruiting wood can be damaged by cold temperatures, particularly after a warm spell and when vines are not fully dormant (in fall or late winter). Damage to the trunk weakens older plants and sometimes kills young vines (see “Common problems”).
A range in cold hardiness zone is provided to determine regional adaptation. Be aware that the cold hardiness zone varies within a region; you may be in zone 5 because your home is at a higher elevation, while the majority of the region is in Zone 6.
Many of these cultivars (and more) are available through local retail and mail-order nurseries. Plants often sell out quickly, so order well in advance of spring planting. Buy a male of the same species.
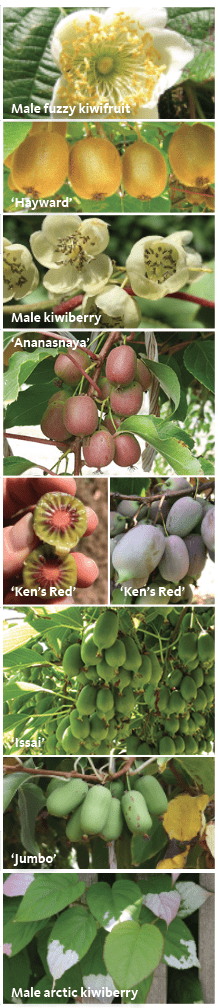
Table 1. Types and cultivars of kiwifruit adapted to Oregon regions and suited for fruit production:
-
Fuzzy kiwifruit (Actinidia deliciosa), Zones 7-9
-
Male: Various male clones are available. Will not produce fruit; needed as a pollinizer for the female cultivars.
-
‘Hayward’: Large fruit (60–90 grams; 3 inches long). Brown skin covered with brown fuzz (hairs). Flesh is green and has a good, sweet flavor. Fruit do not ripen on the plant. Pick after first light frost in the fall in adapted areas.
-
-
Kiwiberry or hardy kiwifruit (Actinidia arguta), Zones 4 or 5-9
-
Male: Various male clones are available. Will not produce fruit; needed as a pollinizer for the female cultivars.
-
‘Ananasnaya’: Called “Anna” by some nurseries. Most popular and well-tested kiwiberry for this region. Fruit are small (6–15 grams; up to an 1 inch long). Skin is green, developing a red blush when exposed to the sun. Flesh is green. Flavor is excellent, tropical-like and highly aromatic. Fruit vine ripen in Oregon (starting in mid-September in the Willamette Valley)
-
‘Ken’s Red’: Fruit are nearly square to cylindrical with a “nib” at the tip. The fruit skin turns from bright green to dull green with a reddish color as fruit ripen. The flesh starts as green, then red streaks develop, turning to reddish purple when fully ripe. Fruit size is similar to or larger than ‘Ananasnaya’ but ripen earlier.
-
‘Issai’: Plants are partially self-fertile and will produce fruit without a male. Fruit are smaller than ‘Ananasnaya’, are somewhat cylindrical, come to a point, and are fully green, even when exposed to the sun. Flavor and aroma are very good. Plants have less vigor than the other kiwiberry cultivars and are sensitive to root rot (see “Common problems”).
-
‘Jumbo’: Large fruit (about double the size of ‘Ananasnaya’). Green skin and flesh. Ripens later and has a bland flavor compared to ‘Ananasnaya’.
-
-
Arctic kiwi or kiwiberry (Actinidia kolomikta), Zones 3–9
-
Male: Various named males are available. Some produce beautiful pink variegated leaves. Will not produce fruit; needed as a pollinizer for the female cultivars.
-
‘Krupnoplodnaya’: Largest fruit of this type of kiwiberry. Skin and flesh are green. Flavor is good with a slight bitter note.
-
Site selection
Kiwifruit vines produce for more than 20 years, depending on the species, climate, soil and pest pressure. Carefully select a site for optimal plant life. Ideal environmental conditions for kiwifruit are full sun exposure and fertile, well-drained, sandy loam or clay loam soil with moderate water-holding capacity. In Central Oregon, amend native soil with compost to increase water-holding capacity. While plants can tolerate partial shade, yield and fruit quality may be lower. Avoid planting in depressed or low-lying areas where cold air may collect. All kiwifruit species are susceptible to frost damage of shoots in late winter to early spring. Avoid spots in your yard exposed to high winds. Kiwifruit vines are susceptible because they have long shoots that can break in the wind. Wind can also cause fruit to rub against each other or stems. This leads to scarring (see “Common problems”).
Kiwifruit plants are also susceptible to verticillium wilt, a soil-dwelling fungal disease. Avoid planting vines in sites where other verticillium-susceptible crops, such as strawberries, raspberries, potatoes, tomatoes, peppers, eggplant and some ornamentals, have been planted in the past five years.
Soil nutrient testing and modification
If you are going to plant kiwifruit in your garden soil, it is a good idea take a soil sample and have it tested prior to planting. Collect soil samples up to a year or more in advance. This will provide adequate time to amend the soil, if necessary. Take samples from the top 12 to 18 inches of soil.
Kiwifruit plants require a soil pH of 5.6 to 6.5. If your soil test indicates that the soil pH is too low (too acidic) or too high (too basic), you can amend the soil to improve the pH. A typical soil analysis will also include phosphorus (P), potassium (K), calcium (Ca), magnesium (Mg) and sodium (Na). Also test for organic matter and boron (B), especially in the Willamette Valley where B deficiency is common. Nitrogen (N) levels in soil are not useful because N is not added prior to planting. Instead, supply N with fertilizer after planting. Table 2 shows recommended nutrient ranges in soil for kiwifruit.
Table 2. Recommended soil nutrient range for kiwifruit:
-
Phosphorus (P)
-
Bray 1 testing method: deficient at less than 20–40ppm
-
Olsen testing method: deficient at less than 10ppm
-
-
Potassium (K): deficient at less than 150–350ppm
-
Calcium (Ca): deficient at less than 1,000ppm
-
Magnesium (Mg): deficient at less than 120ppm
-
Boron (B): deficient at less then 0.5–1.0ppm
Soil that has the wrong pH, poor drainage or is of the wrong soil type can usually be improved. Gardeners can increase the organic matter content, modify soil pH to the ideal range by amending it with lime or sulfur or modify soil nutrient levels, if needed.
For more information, see A Guide to Collecting Soil Samples for Farms and Gardens, EC 628, Analytical Laboratories Serving Oregon, EM 8677, and Soil Test Interpretation Guide, EC 1478.
Soil pH
In the Willamette Valley, ask for a Shoemaker-McLean-Pratt (SMP) buffer test on your soil nutrient analysis. The SMP value helps determine how much lime to apply if the soil pH is below the ideal range for kiwifruit. In Central, eastern, and southeastern Oregon, soils tend to be neutral to more alkaline, so the SMP test is probably not necessary. Ideally, you would test the soil a year before you plant to give yourself enough time to modify the soil pH, if required.
If the soil pH is too high (above 6.5), amend soil with elemental sulfur to acidify the soil. The rate depends on soil type and the current pH of the soil. In sandy-type soils, use approximately 1–3 pounds of sulfur per 100 square feet. In clayey-type soils, use approximately 5–6 pounds per 100 square feet. For more information see Acidifying Soil for Blueberries and Ornamental Plants in the Yard and Garden, EC 1560, and Acidifying Soil in Landscapes and Gardens East of the Cascades, EC 1585.
In general, if your soil pH is too low (below 5.6) for kiwifruit production, incorporate finely ground dolomitic limestone at a rate of approximately 5–10 pounds per 100 square feet. You can also use high-pH composts to add organic matter and increase soil pH. However, avoid composts with a high salt content (electrical conductivity or EC), such as fresh animal manures. Incorporate amendments into the soil about a year prior to planting, as it takes time for the soil pH to adjust. For more information, see Applying Lime to Raise Soil pH for Crop Production (Western Oregon), EM 9057, and Eastern Oregon Liming Guide, EM 9060.
Drainage
Kiwifruit vines are sensitive to poor drainage during the growing season. Because of their large root systems, these plants benefit when planted in well-drained soil that is at least 2–3 feet above the water table. Kiwifruit plant roots will suffocate in soils that are waterlogged for more than a few days in a row during the growing season, and the likelihood of root rot will increase. Organic matter aids in soil aeration, drainage and the capacity to hold water and nutrients.
Organic matter
You can increase soil organic matter content by amending with fine, aged wood chips, sawdust, bark or plant-based composts. Compost is the best option for amending native soil in Central Oregon. It is important that whatever material you apply is free of pest insects and weed seeds. Apply organic matter at a rate of 1–2 inches deep for each area being planted. Each of these organic materials differs in nutrient content, pH, salt content (EC) and carbon-to-nitrogen ratio (C:N), which affects the rate of decomposition.
Incorporate the organic material into the soil by digging or tilling. Mixing the amendments in well ensures uniformity of soil properties. If you apply large amounts of fresh organic material with a high C:N, such as sawdust, you can aid decomposition by applying approximately 3 ounces of N per 100 square feet. In areas with little summer rain, irrigating the intended planting area will ensure amendments such as lime or sulfur and organic materials react well with the soil.
Propagation
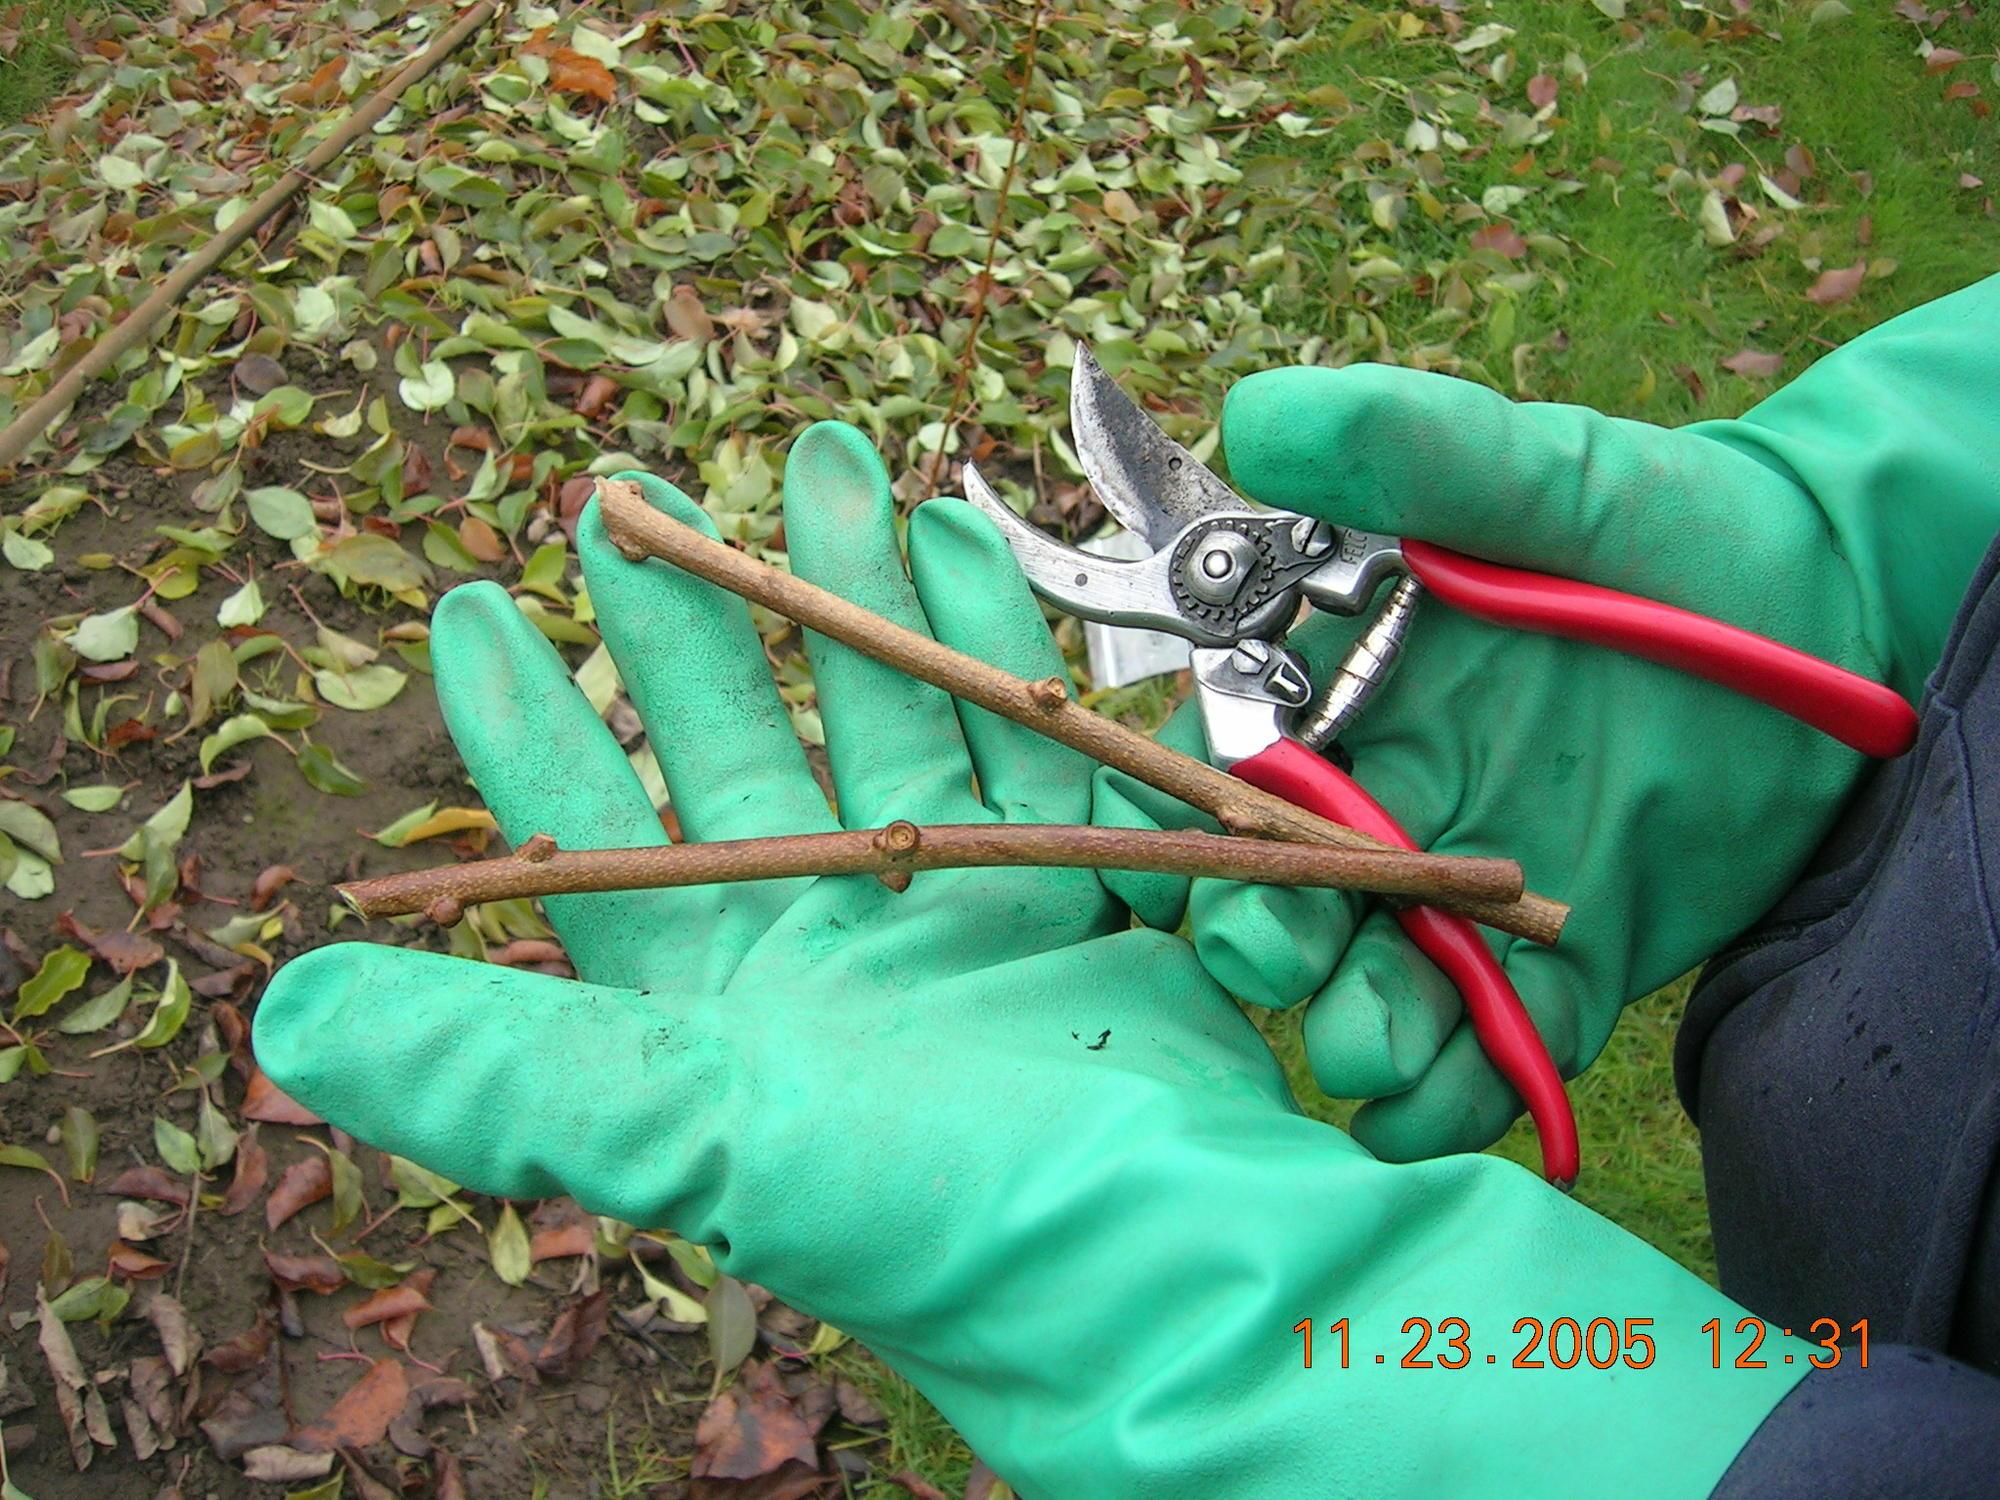
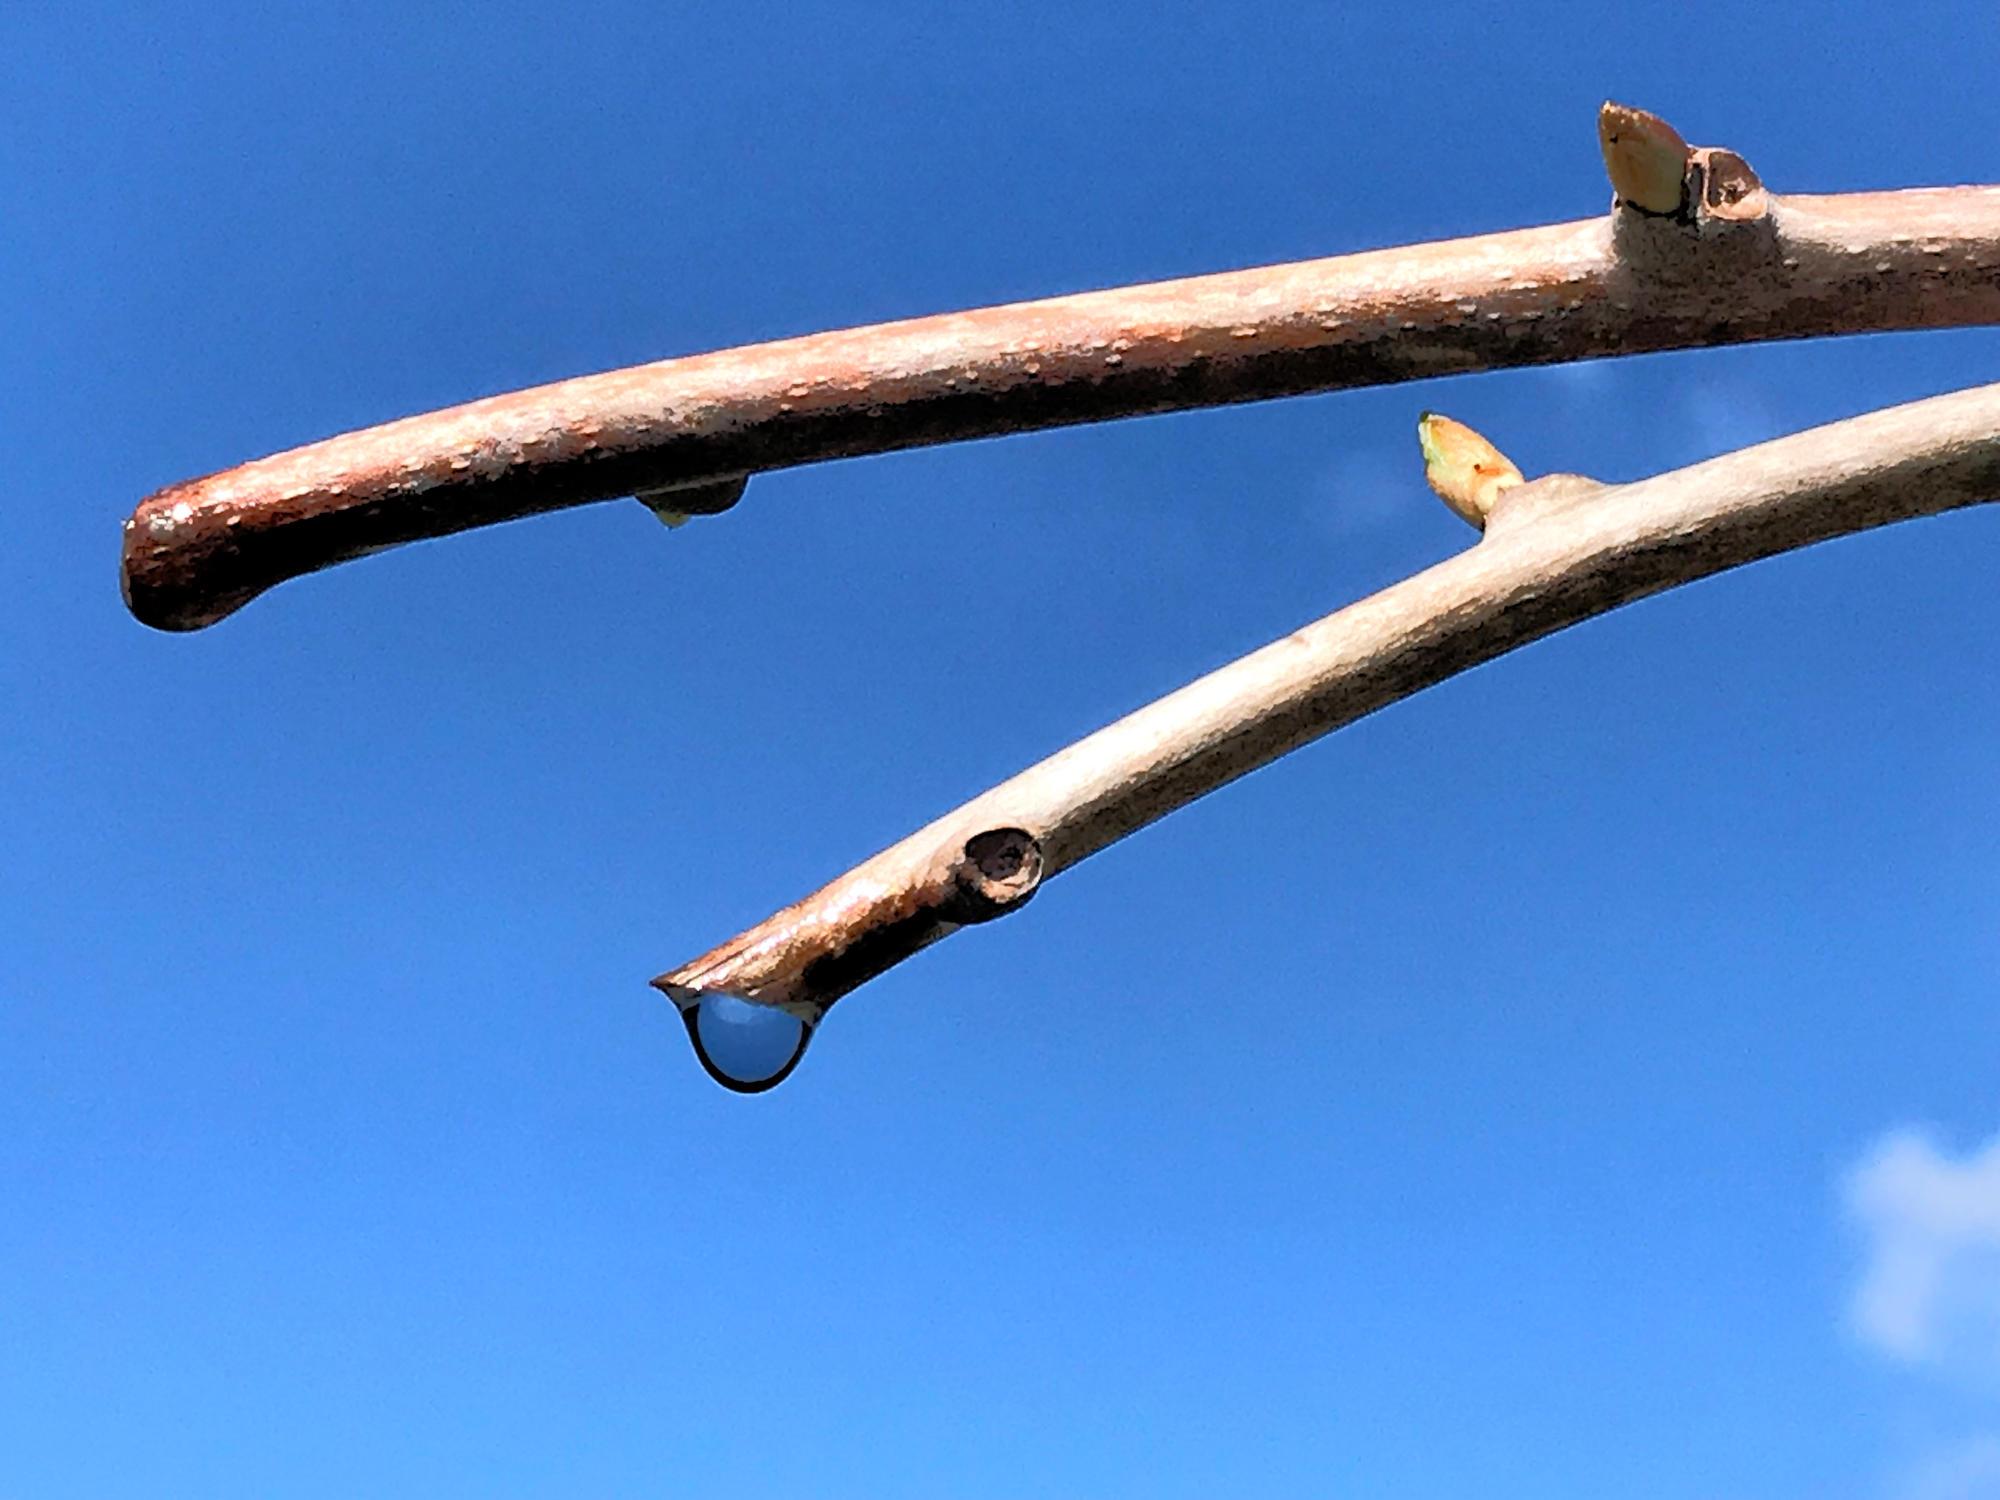
Kiwifruit are easy to propagate from hardwood cuttings if you know someone who has a good male and female vine. Just ask to take some cuttings from their pruning wood in late winter. It’s important to take cuttings so you can distinguish the bottom (closest to the trunk) from the top (nearer the end of the shoot or cane). The bud at each node in this crop is round, making it hard to tell which way is up. One trick is to cut just below a basal bud and at an angle in the internode for the top end of the cutting. Make cuttings about five to six nodes long (Figure 8). Take cuttings in winter before sap starts to flow (in early to mid- January in the Willamette Valley). Fill 1-gallon containers with potting mix. Insert one cutting per pot with one or two nodes below the level of the soil. You can dip the base of cuttings in a rooting hormone, but it is not necessary. Propagate both male and female vines in winter, even though male vines are pruned in summer (see “Pruning and training”). Label male and female vines carefully so you can be confident you have one of each to plant. Many of the cuttings will root. Grow vines for one season in the containers. They should be ready to plant in your yard the following spring.
Plant as early as you can work the soil in spring. Dig a hole large enough to accommodate the size of the root ball. Do not add fertilizers or manures to the planting hole because they will burn the roots. Remove the pot and set the plant so that the pot’s container mix is level with the soil. Fill the planting hole with soil and firm the soil to remove air pockets. Water young plants frequently to ensure plant roots do not dry out. Once they start growing, kiwifruit vines need careful and frequent irrigation (see “Irrigation”).
The most important goal in the planting year is to develop a single, straight trunk. Prune at planting time and train well in this first year for good establishment and management (see “Pruning and training”).
Planting
Kiwifruit plants are generally available in containers from local retail or online nurseries. One female cultivar will produce a lot of fruit (see “Harvest”), so typically only one female and one male are planted in most home gardens. One plant needs about 15 feet of space. Plant two vines 15 feet apart and leave about 6 feet on each end. When training to an arbor, plant one vine in the middle of each of two sides (Figure 9) (see “Pruning and training”).
Mulching
A mulch of sawdust, wood chips or bark can help control annual weeds and conserve soil moisture (Figure 9). In areas where the soil can freeze and thaw during winter, leading to heaving, apply a mulch around the crown to help protect plants from winter cold injury. Be careful to not mound the mulch around the base of the trunk, which can promote rot. Don’t use deep straw as a mulch during the growing season because it can lead to increased vole, field mice or other rodent activity, which can damage the plants.
Irrigation
Kiwifruit vines need adequate water to thrive, either from irrigation or rainfall. Fruit is made up of mostly water and the vines are vigorous, so sufficient irrigation is essential for good growth, yield and fruit quality. Newly set plants do not have well-developed root systems, so plants can be easily stressed. Irrigate several times a week or as needed so that the root zone and soil are thoroughly wetted but standing water does not accumulate. Established kiwifruit vines have a canopy as large as 100 square feet. Plants this large need a lot of irrigation water. How much also depends on stage of growth, soil type and weather. Monitor your irrigation carefully, whether done by hand, sprinkler or soaker hose, to ensure the proper amount of water is being applied. Look for early signs of water stress, such as leaves starting to fold or wilt. Irrigate quickly if you see this. With each irrigation, wet the soil to a depth of 1 foot. The rooting area should be wet enough that the soil does not fully dry out between irrigation cycles. Sandy soils require more frequent watering than heavier soils. You can dig down into the soil to check if the soil is wet — but not too wet — between irrigations.
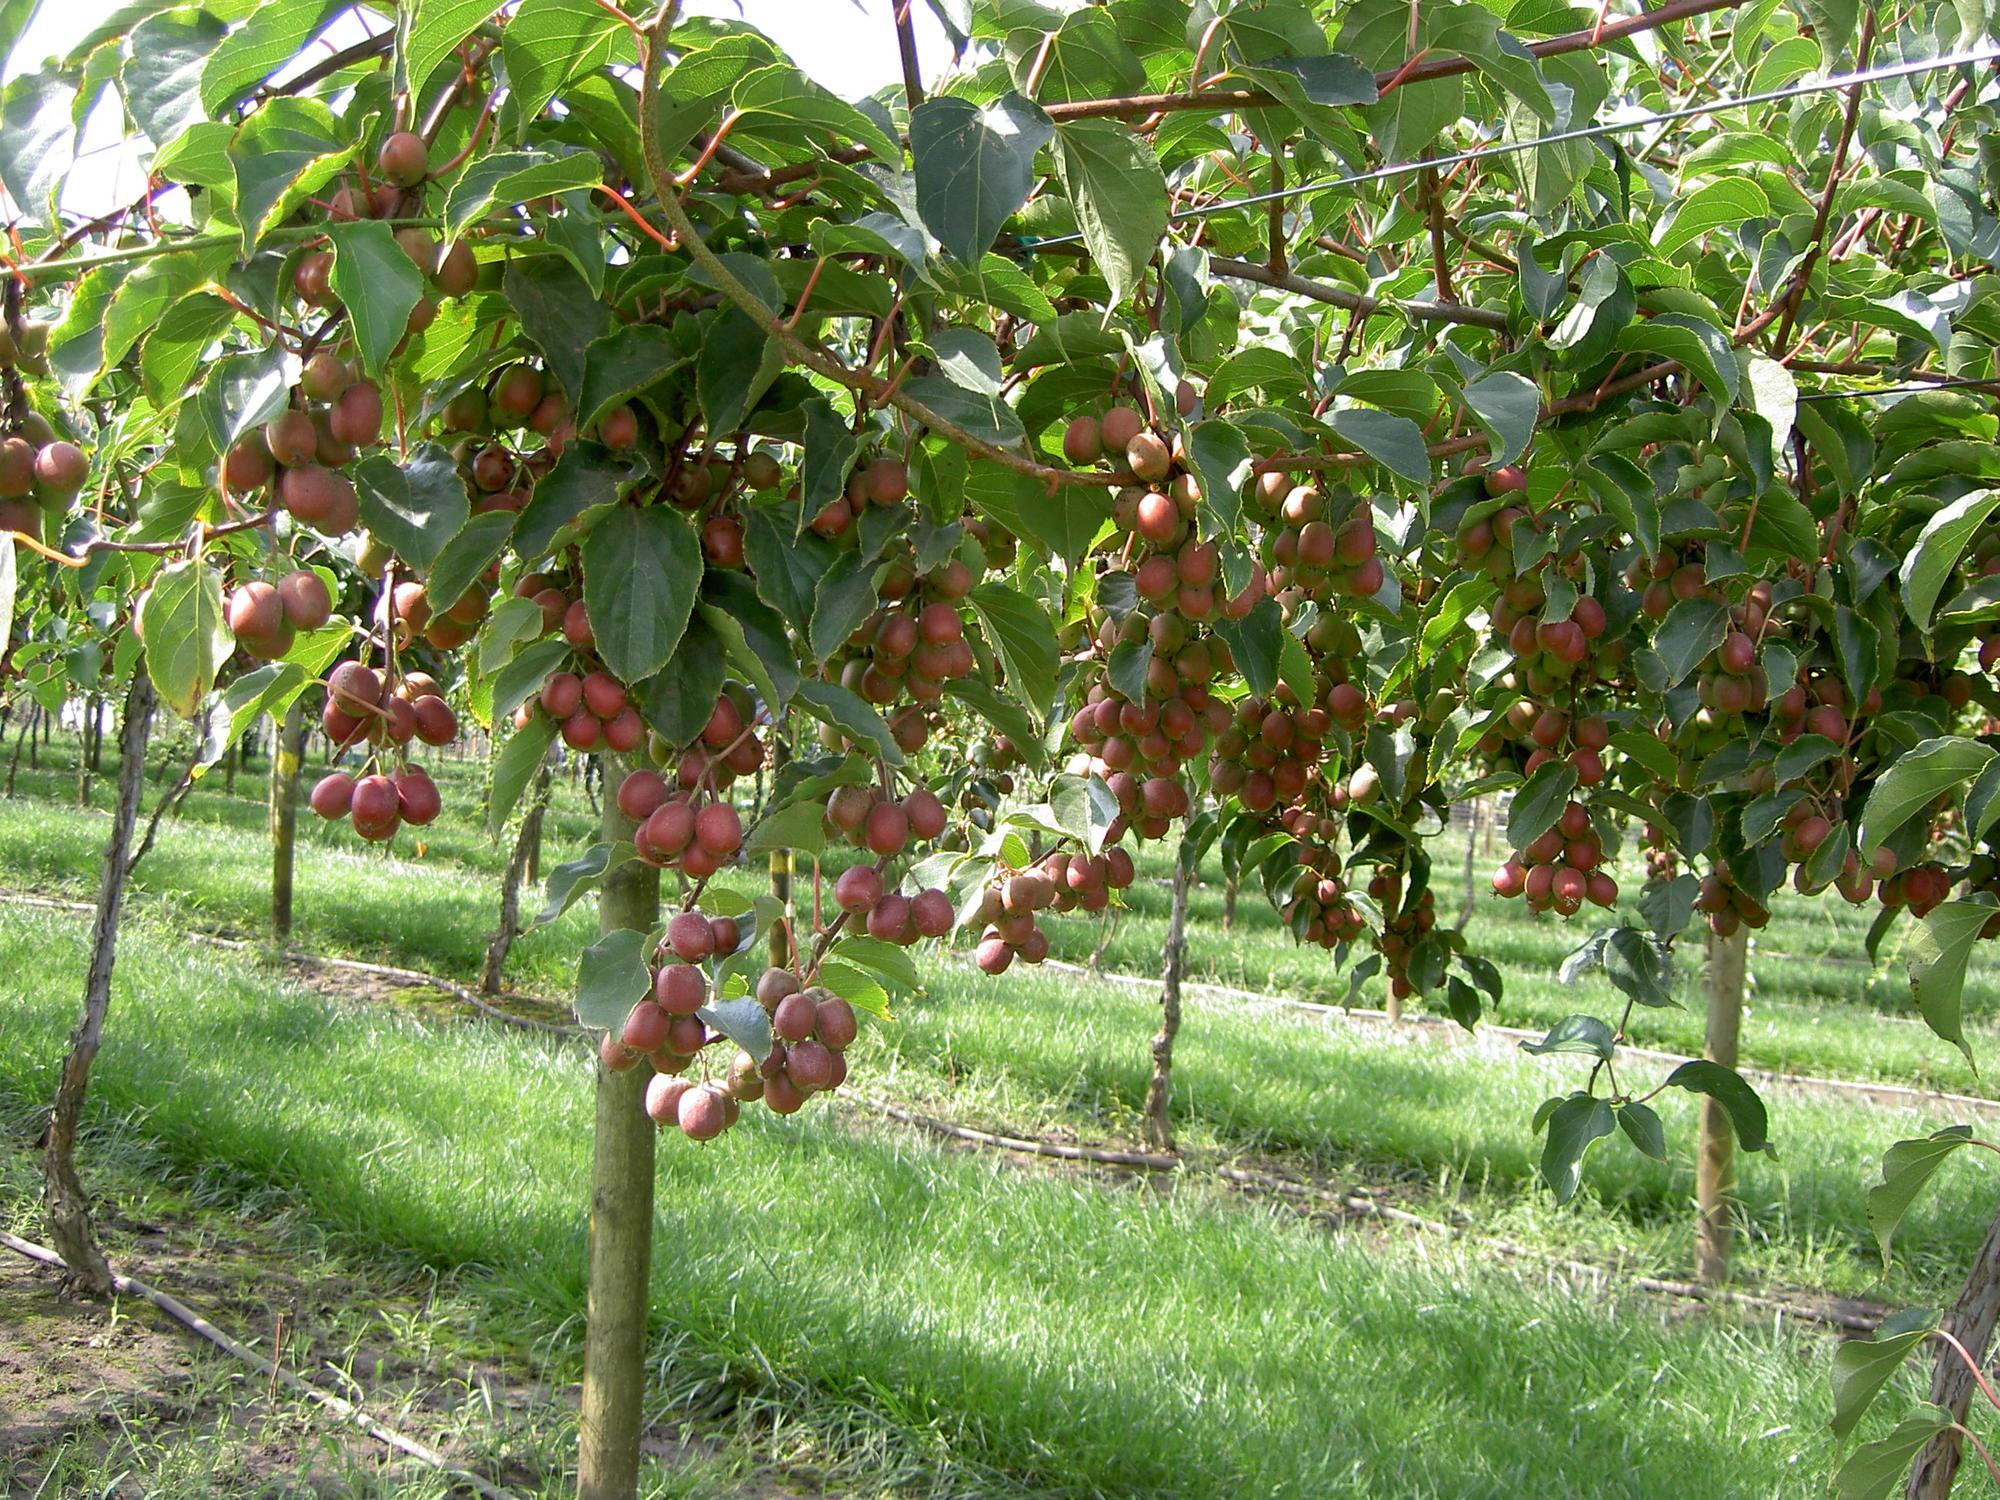
Trellising
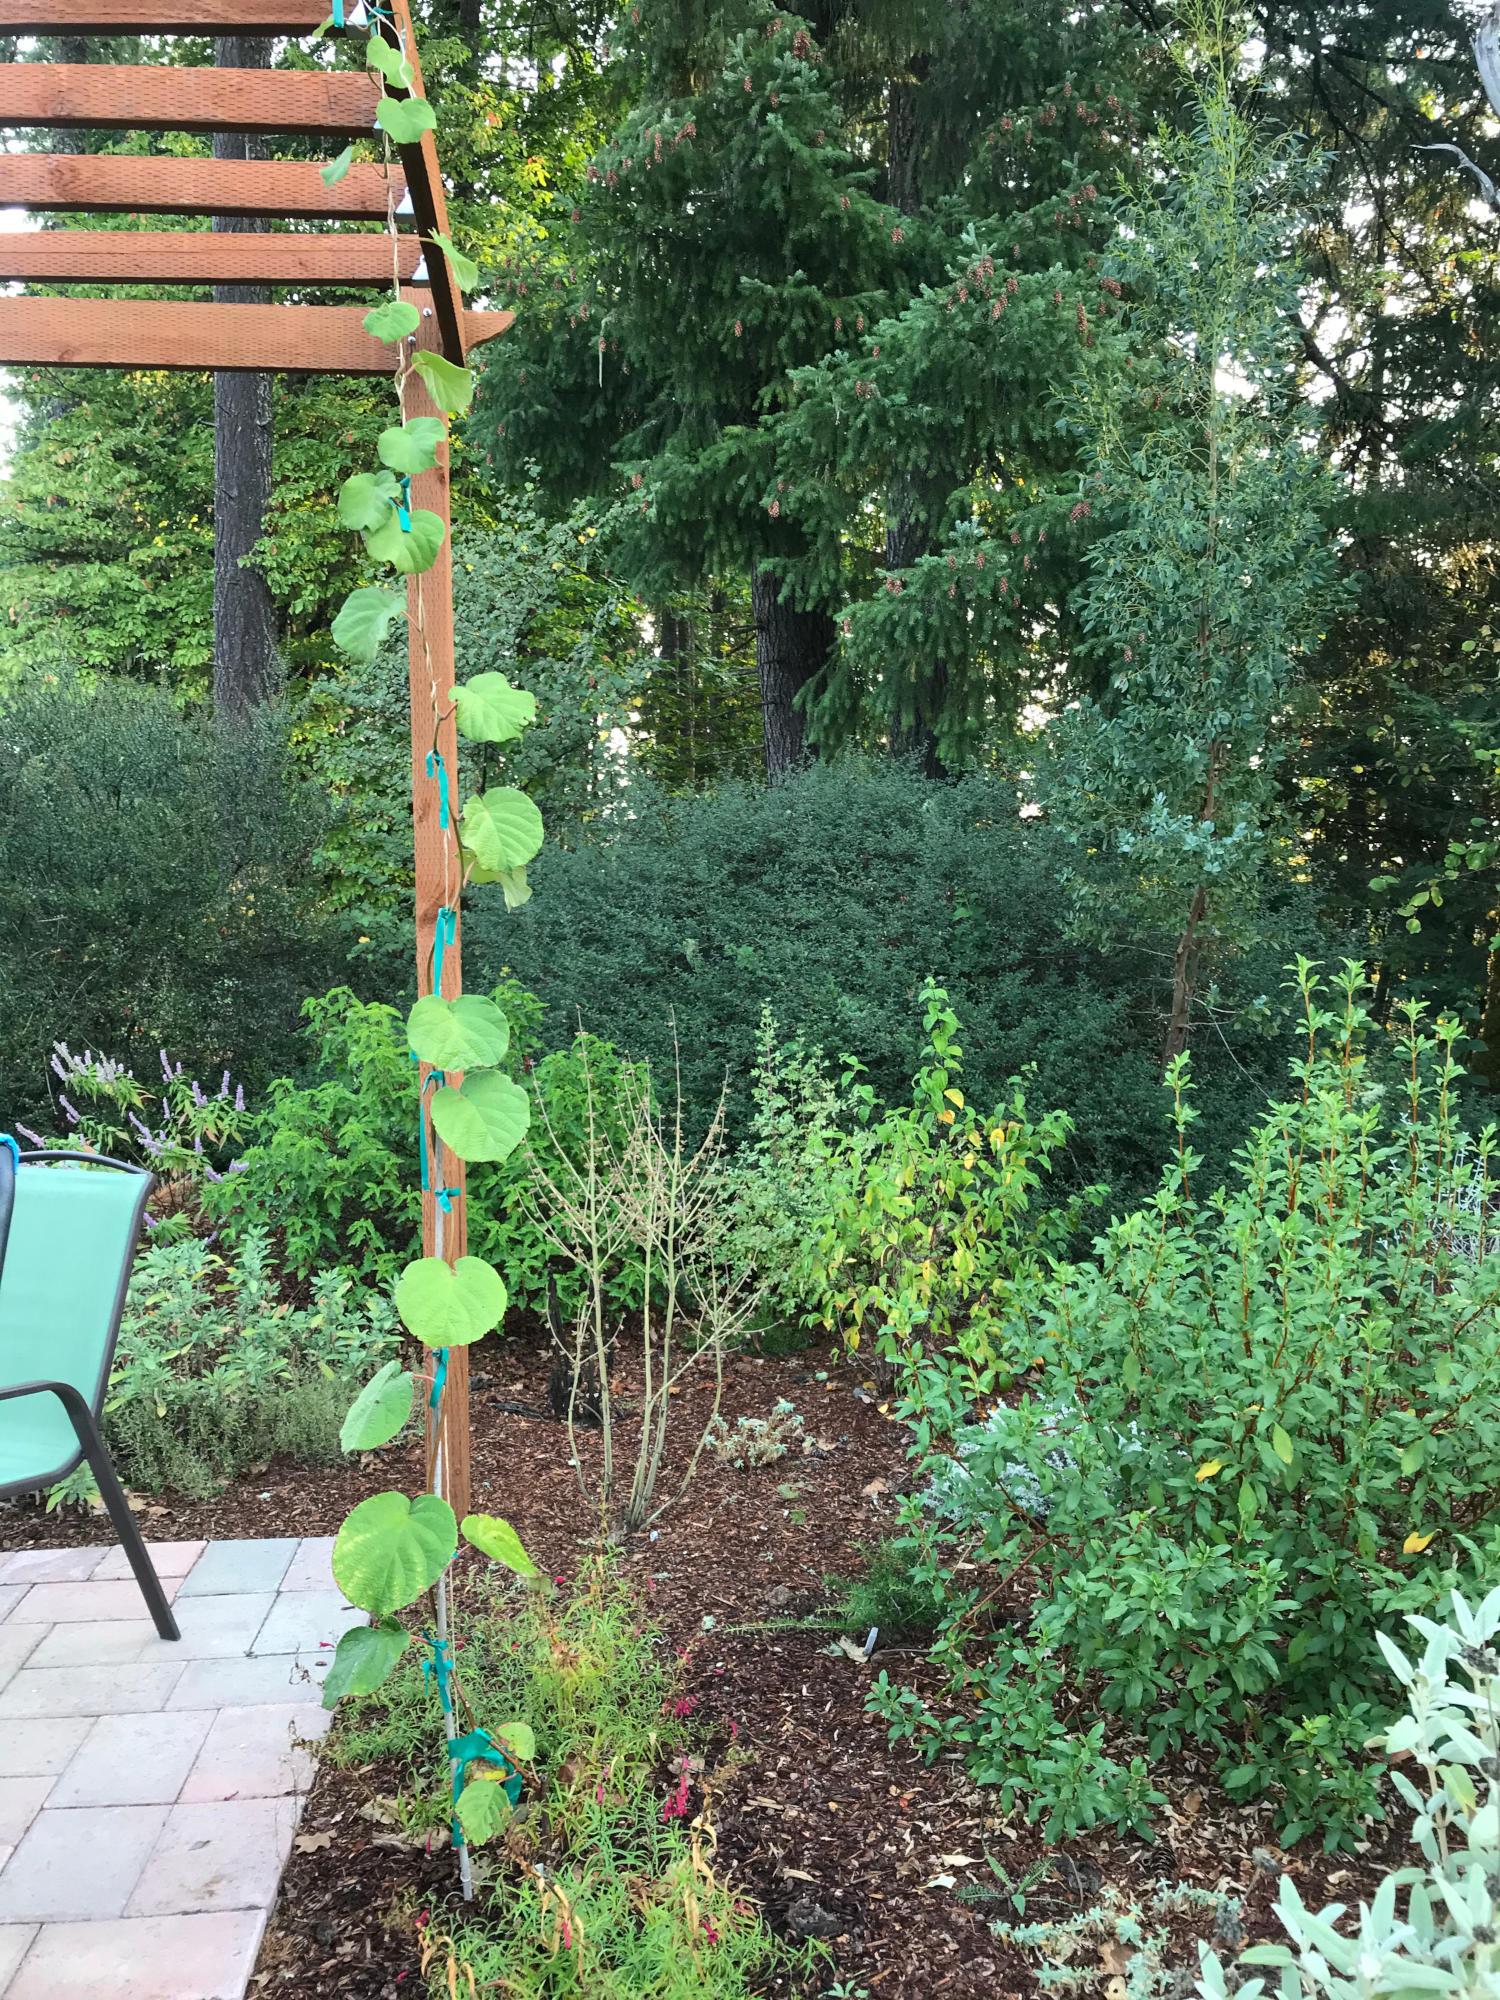
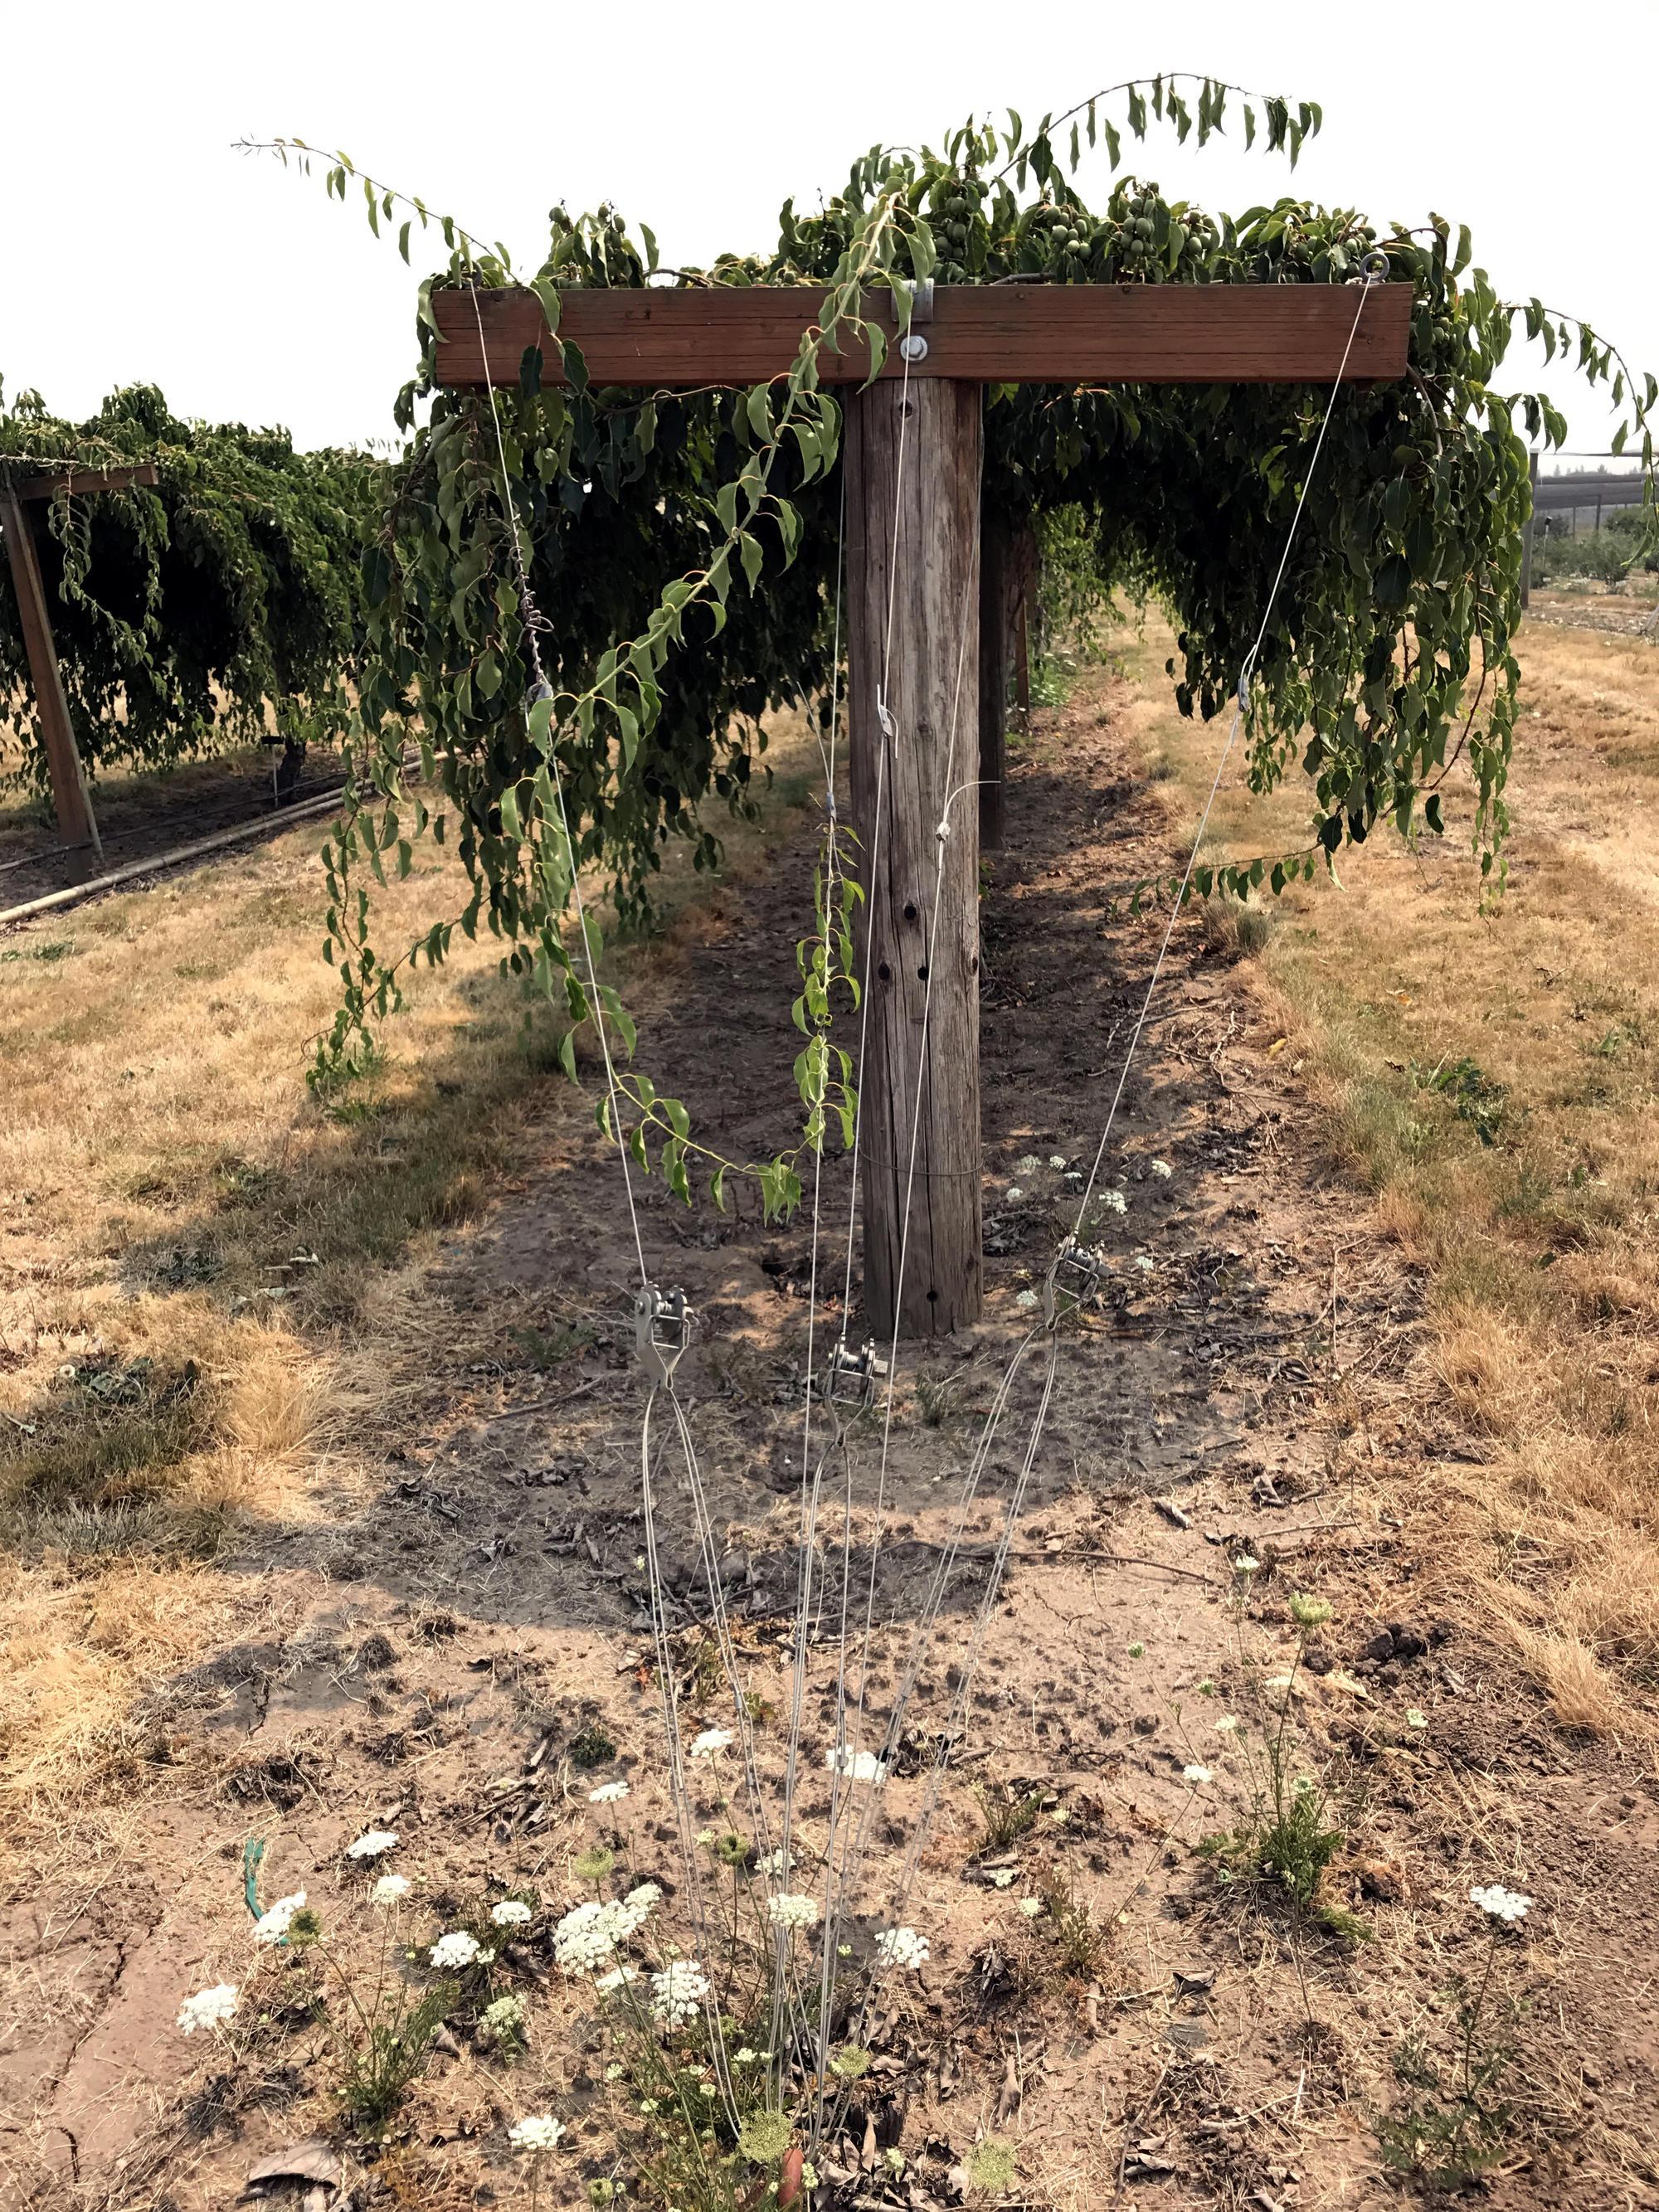
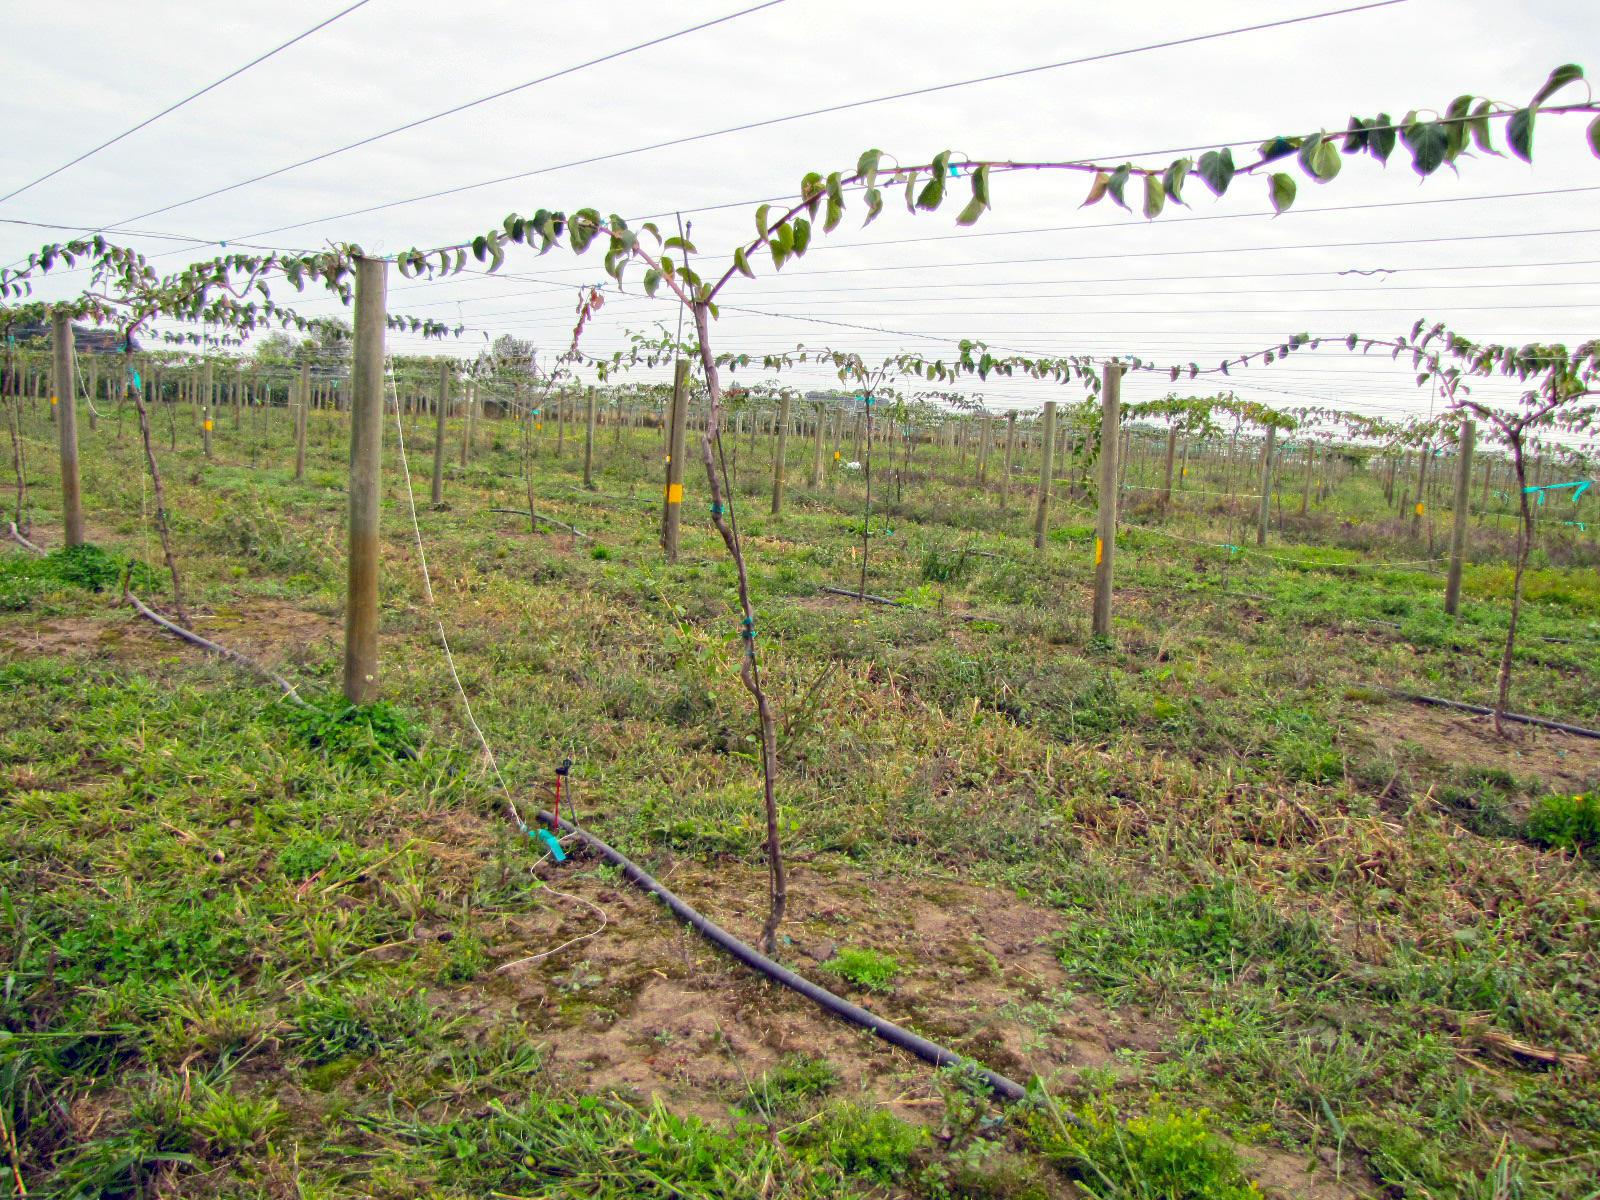
Kiwifruit vines are not self-supporting. They are climbing vines (Figure 10). Their size, vigor, longevity and heavy crop load mean they need a strong, permanent support structure. A good support structure will also reduce sunburn and wind damage to the vine and fruit (see “Common problems”). Two common types of trellis support for the home garden include an arbor and a T-bar.
The T-bar trellis system consists of 4- to 6-inch-wide metal or pressure-treated wooden posts at each end. Anchor the end posts well so they do not lean or break when the vines are mature and loaded with fruit. Attach a strong cross arm at 6 to 7 feet above ground level on each post. The cross arm should be 4 to 5 feet wide (Figure 11). A high cross arm allows for standing under the canopy to pick fruit. You can brace the cross arms to the posts with wood for additional strength. Run high-tensile wire down each side and the top middle of the cross arms. You can also add two intermediary wires at the top of the cross arm to support the vines and fruit. Strong tension is needed, so use galvanized, 12-gauge wire and install good wire tighteners.
Arbors should be well constructed to support the weight of two vines (male and female) (Figures 9 and 10). Use strong corner posts that are braced to cross members. Add more cross pieces to build an arbor in the shape of a rectangle or square with braces at each corner and strong cross pieces at the top that will support the bulk of the vine weight. The arbor should be high enough that you can walk underneath when fruiting shoots are hanging down — a minimum of 7 to 8 feet high. Prune and train the vines well so that the arbor is ultimately covered with shoot growth for shade (see “Pruning and training”).

Nutrient management
Healthy kiwifruit plants with sufficient fertilizer nutrients have medium to dark green leaves. Pale green or yellow leaves indicate a problem with nutrients, insects or disease. Kiwifruit plants are vigorous, and as they get older plants need more nitrogen (N) to support the growth. Plants deficient in N will have poor growth and older leaves that are pale green or yellow compared to younger leaves. In kiwiberries, it’s normal for leaves in the shade or depth of the canopy to turn yellow at the end of the growing season at harvest time.
Kiwifruit plants need fertilizer in the planting and establishment years. There are many types of solid, or granular, and liquid inorganic and organic fertilizers available. Most all-purpose garden fertilizers or organic products contain P (phosphate) and K (potash) as well as N, and some also contain Ca (such as feather meal). Fertilizer sources range considerably in their nutrient content. For example, common inorganic fertilizers available for the home garden include 16–16–16 (16% each of N, phosphate and potash), 20–20–20 and various slow-release, sulfur-coated urea products. Organic sources include cattle (0.6–0.4–0.5) and horse (0.7–0.25–0.6) manure, yard-debris compost (1–0.2–0.6), cottonseed meal (6–7–2), feather meal (12–0–0), bone meal (2–15–0) and fish emulsion (3–1–1).
The most important nutrient needed by kiwifruit plants after planting in all home garden soils is N. Depending on the type of fertilizer product, there are different application methods to ensure maximum availability of N to the plants.
Inorganic granular fertilizers are often applied in equal portions (splits) throughout the spring and summer to ensure maximum efficiency of plant uptake and minimize risk of salt stress to the plants. Granular organic fertilizers such as feather, soybean or cottonseed meals require longer periods of time for N to be available. Therefore, it’s best to apply granular organic fertilizers about a month before inorganic fertilizers would be applied. In general, liquid fertilizers are available relatively quickly to plants but may also move out of the root zone quickly. So, for liquid fertilizers, divide the total amount of N into smaller, more frequent applications, such as weekly.
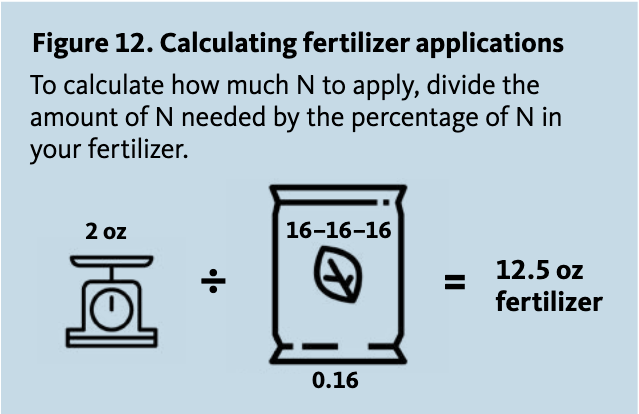
Fertilizer recommendations for N below are given in weight of actual N per plant for the year. How much fertilizer to apply depends on the percentage of N in the product. To calculate how much N to apply during the year, divide the amount of N you need by the percentage of N in the fertilizer. For example, if the recommendation is to apply 2 ounces of N and you are using 16–16–16 fertilizer (16% each of N, phosphate and potash), the calculation would be 2 ounces ÷ 0.16 (decimal equivalent of 16%), or 12.5 ounces of the fertilizer product (Figure 12). In another example, if you wanted to use soybean meal (6–2–1) you would need about 33 ounces or 2.1 pounds of product (2 ounces ÷ 0.06).
New and establishing plantings
In the planting year, fertilize each plant with 1.2 ounces of N per plant. Divide the total required N into three equal portions (0.4 ounces each), the first starting two weeks after planting, the next one month later, and the last one a month after that (May, June and July in the Willamette Valley) (Table 3). When using organic fertilizer sources, apply the product relatively earlier as described above. Make inorganic fertilizer applications more frequently on sandy soil, dividing the total rate into more split applications, or use slow-release products such as many organic sources of fertilizer (see above).
Spread the fertilizer around the base of the trunk in a 12-inch-diameter circle but avoid getting any on the trunk. The year after planting, apply a total of 3.2 ounces of N per plant, dividing into four equal portions applied monthly (April, May, June and July in the Willamette Valley). Spread the fertilizer evenly within a 2- to 3-foot diameter circle around each plant. Fertilize third- and fourth-year plants with 6 to 9 ounces of N, divided into three applications (every other month from March through July in the Willamette Valley). Spread out the fertilizer so that it is equally distributed under the plant canopy.
Do not fertilize young plants after July; this will force late growth and increase the potential for frost injury in the fall. Since most garden fertilizers contain P and K, plants should also get sufficient amounts of these nutrients when fertilizing. Irrigate well after each fertilization.
Established plantings
Vines are generally mature in the fifth or sixth year. Fertilize with 0.5 to 1 pound of N per vine per year, depending on the cultivar or vine vigor. Use higher rates for vines with more vigor. Apply two-thirds of the total N in March; apply the last third in May or June (Table 3). Spread fertilizer so that it is equally distributed under the plant canopy. Irrigate a day or two before applying fertilizer, unless there has been a good rainfall, and then irrigate again after fertilizing.
Monitor soil pH every few years and add lime in fall to increase soil pH in the Willamette Valley. Add elemental sulfur in Central Oregon to decrease soil pH and maintain it within the desired range.
| Year | Nitrogen rate per plant per application | When to apply Months are for the Willamette Valley; shift as needed for other regions. |
|---|---|---|
| Planting year | 0.4 ounces | May, June, July |
| Second year | 0.8 ounces | April, May, June, July |
| Third year | 2 ounces | March, May, July |
| Fourth year | 3 ounces | March, May, July |
| Fifth year and older | 8–16 ounces per year | March (two-thirds), late May (one-third) |
Harvest
One well-managed kiwifruit vine paired with a male vine will produce more than enough fruit for a large family. Yield of a mature ‘Hayward’ vine ranges from 70 to 100 pounds (Figure 13). Kiwiberry vines typically produce 60 to 150 pounds per plant when mature (Figure 14); ‘Issai’ has less yield than the other recommended cultivars because plants are less vigorous. Yield may vary by region and is affected by management, particularly pruning.
Vines will produce their first crop in the third year (Figure 15), and yield will increase until the fifth or sixth year. Once plants are mature, yield will be relatively stable from year to year. Pruning kiwifruit vines of any type is critical to producing fruit of typical size for the cultivar (see “Cultivars”) and a stable yield from year to year. Also, fruit on improperly pruned plants is more difficult and labor intensive to harvest (see “Pruning and training”).
Harvesting kiwifruit of any type at the proper stage is important for good fruit quality. Kiwifruit do not change much in size or appearance during the latter stages of fruit ripening. Visual assessment is not a good guide on when to harvest.
Kiwiberries
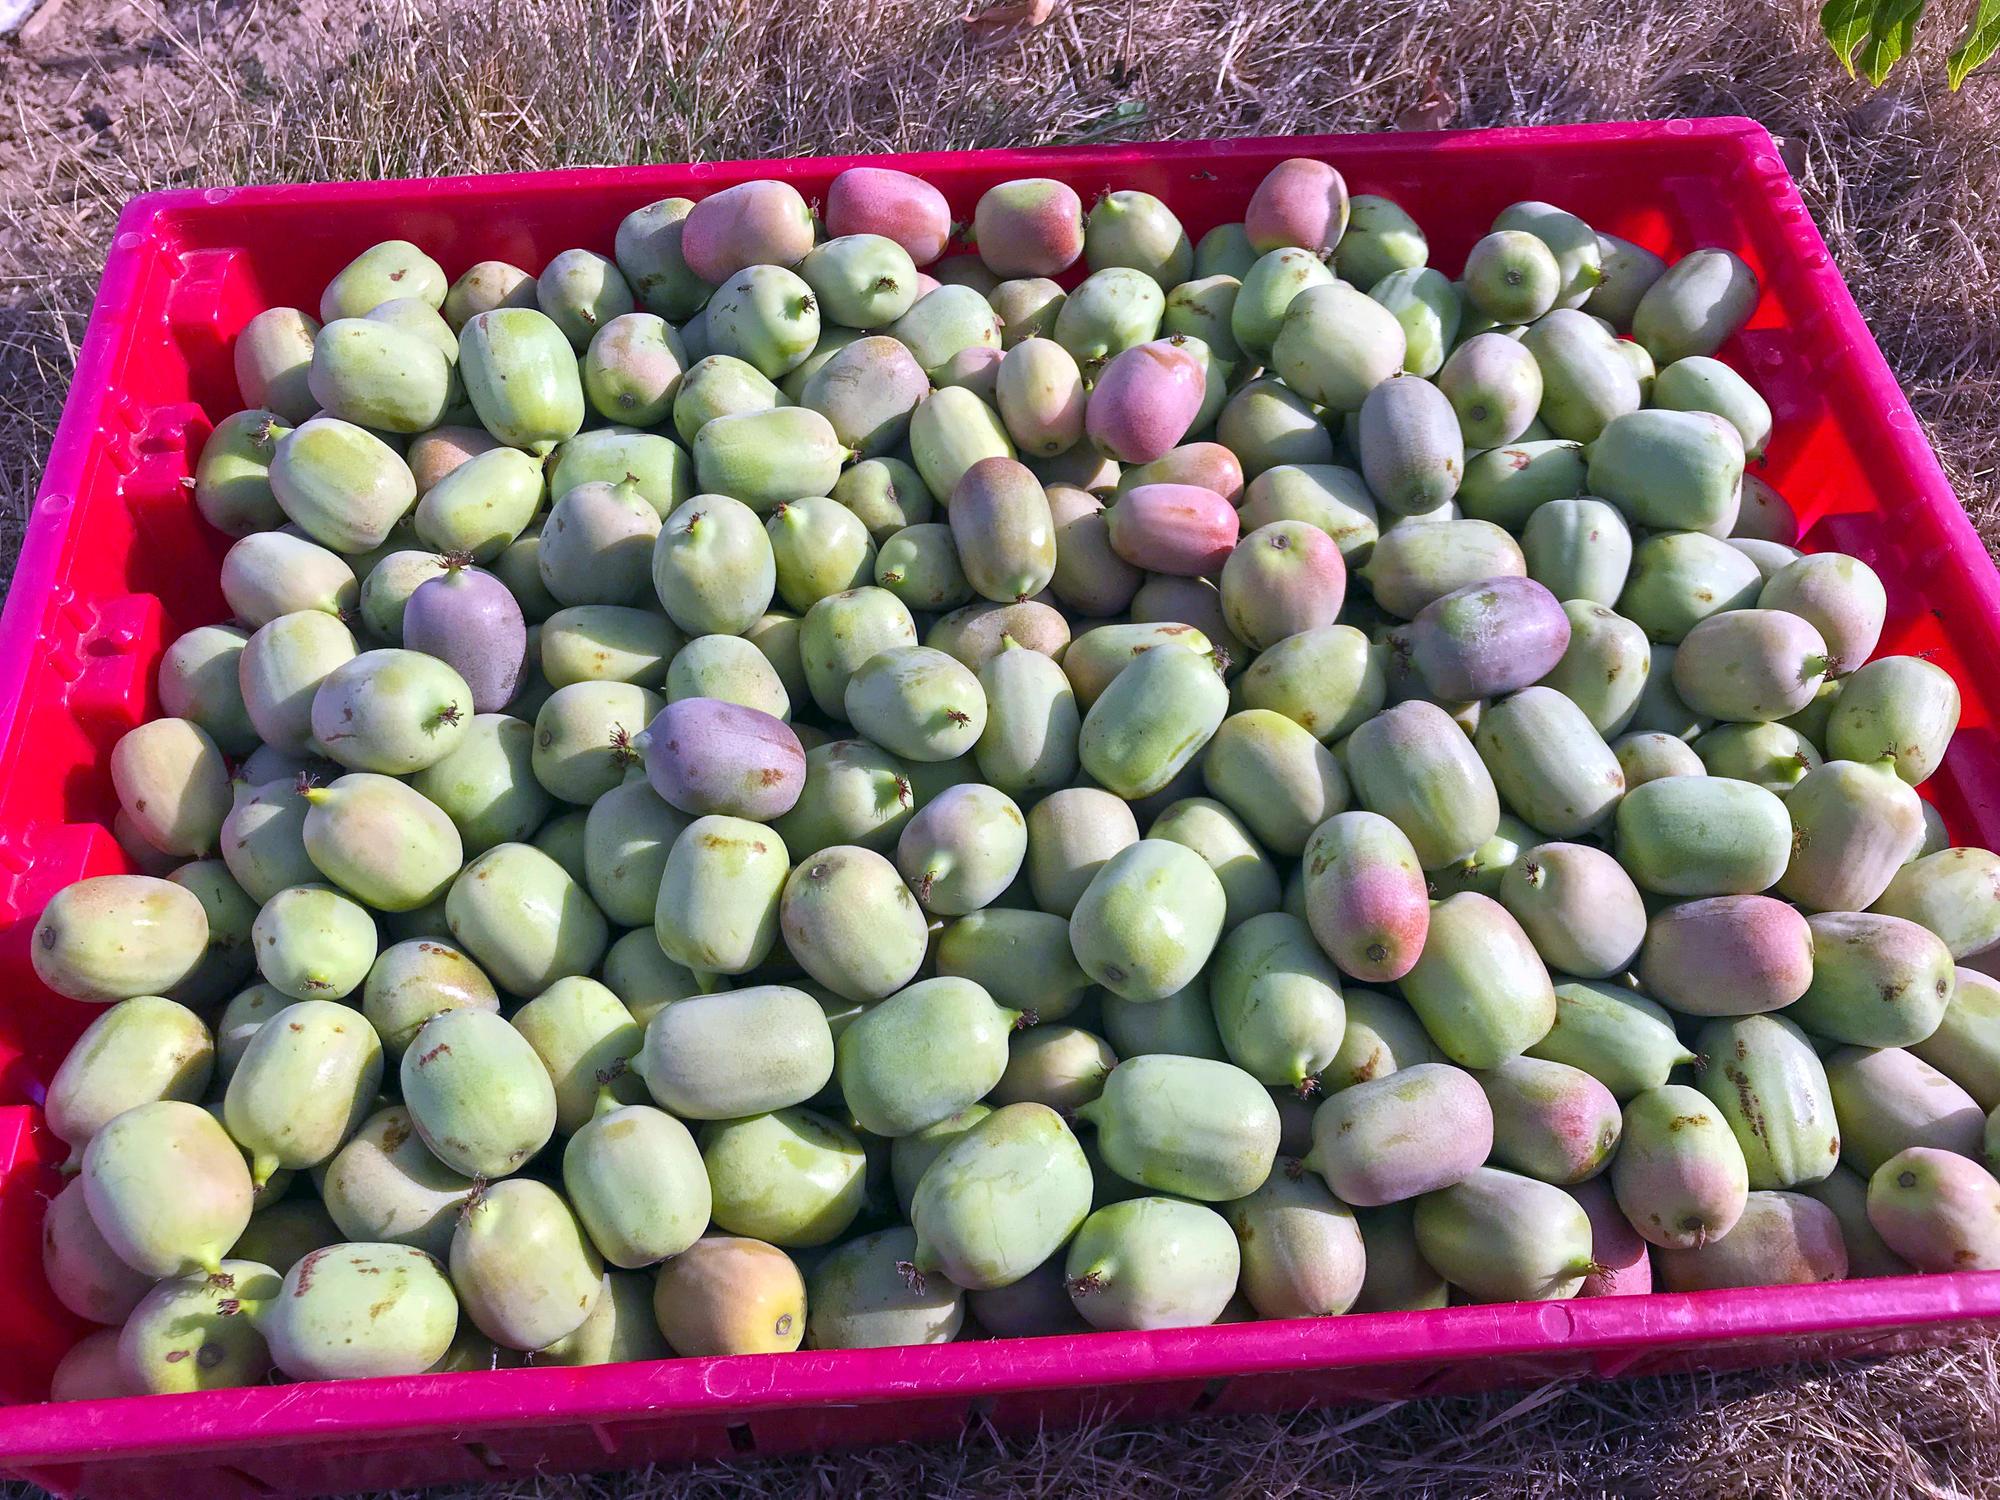
The skin color of kiwiberries is not a good indicator of ripeness at the early stages of harvest. ‘Ananasnaya’ fruit is green in the shade but has a red blush in sun (Figures 16A and B). The fruit on a vine do not all ripen at the same time (Figure 17). Ripening starts in early September in the Willamette Valley, but may be earlier in regions with warmer summers.
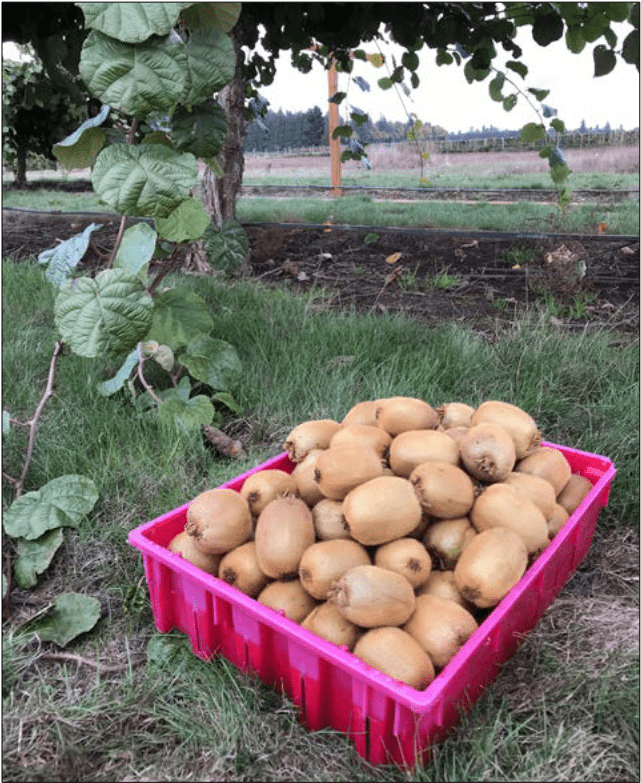
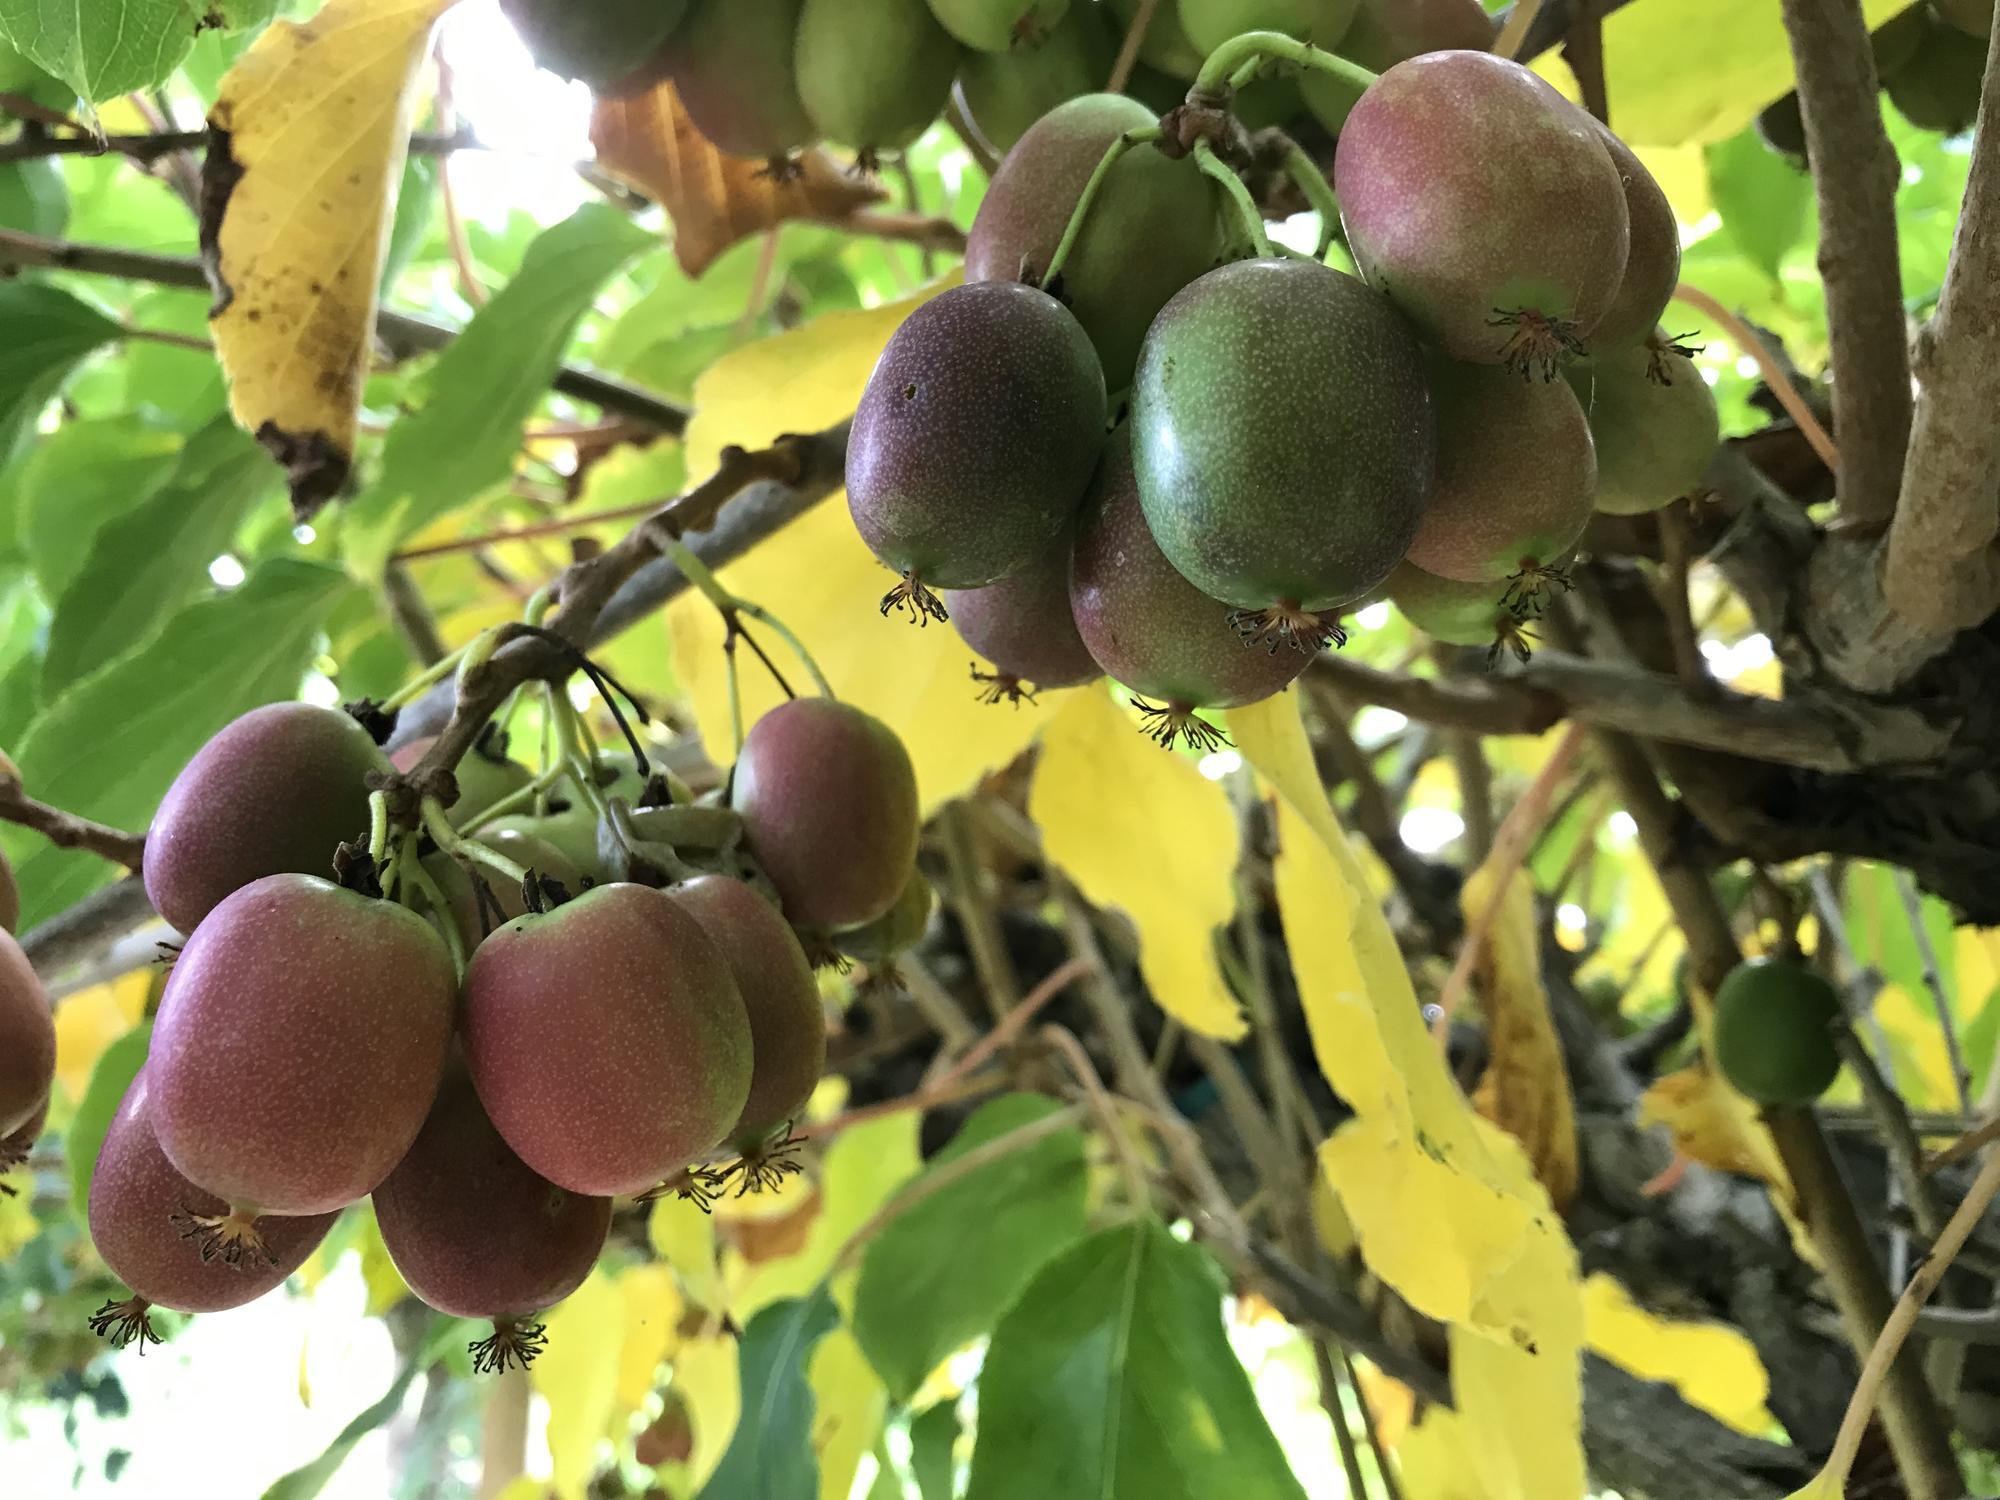
Tasting kiwiberries is the easiest way to see if you can begin harvesting. Taste the fruit once it starts to soften. Fruit will further soften as ripening continues, and flavor will continue to develop. Fruit that are vine ripe will be very soft and have a dark green color. These may taste overripe, but some people like this intense flavor (Figure 17). You can either pick all of the fruit at once (Figure 14) and store them in the refrigerator or pick multiple times as the fruit ripen. Fruit can be stored in the refrigerator in vented plastic bags for several weeks. They will continue to ripen slowly. Kiwiberries that are still too firm to eat right away can be ripened on the counter or in a fridge. Freeze ripe kiwiberries whole for later use.
Pick kiwiberries by pulling them off the plant. Wash your hands and pick into clean containers. If the stem remains attached to the fruit you can remove it by breaking or cutting. Use care when picking really soft fruit. If you pull on these when you pick them the fruit stem will tear the fruit skin. Fruit that leak juice from a tear cannot be stored; eat it right away. Try to avoid picking when fruit is wet from dew, fog or rain, and don’t wash before storage. Wet fruit will decay faster, so let it dry before putting it in the refrigerator. Ripe kiwiberries contain 18% to 25% sugars and have a pH of 3.1–3.6; these are high-acid fruit.
Fuzzy kiwifruit
Fuzzy kiwifruit don’t vine ripen in any region. They are picked when still hard at a physiological stage of ripeness so they will ripen properly after harvest. The first indication that fruit are approaching harvest stage is that seed color changes from light to dark brown and then black. Only fruit with black seeds will ripen. When you think fruit are close to ready for harvesting, cut a fruit horizontally to make sure the seeds are black.The much later ripening of ‘Hayward’ is shown in Figure 18, where sliced fruit is compared with ‘Ananasnaya’ in mid-September.
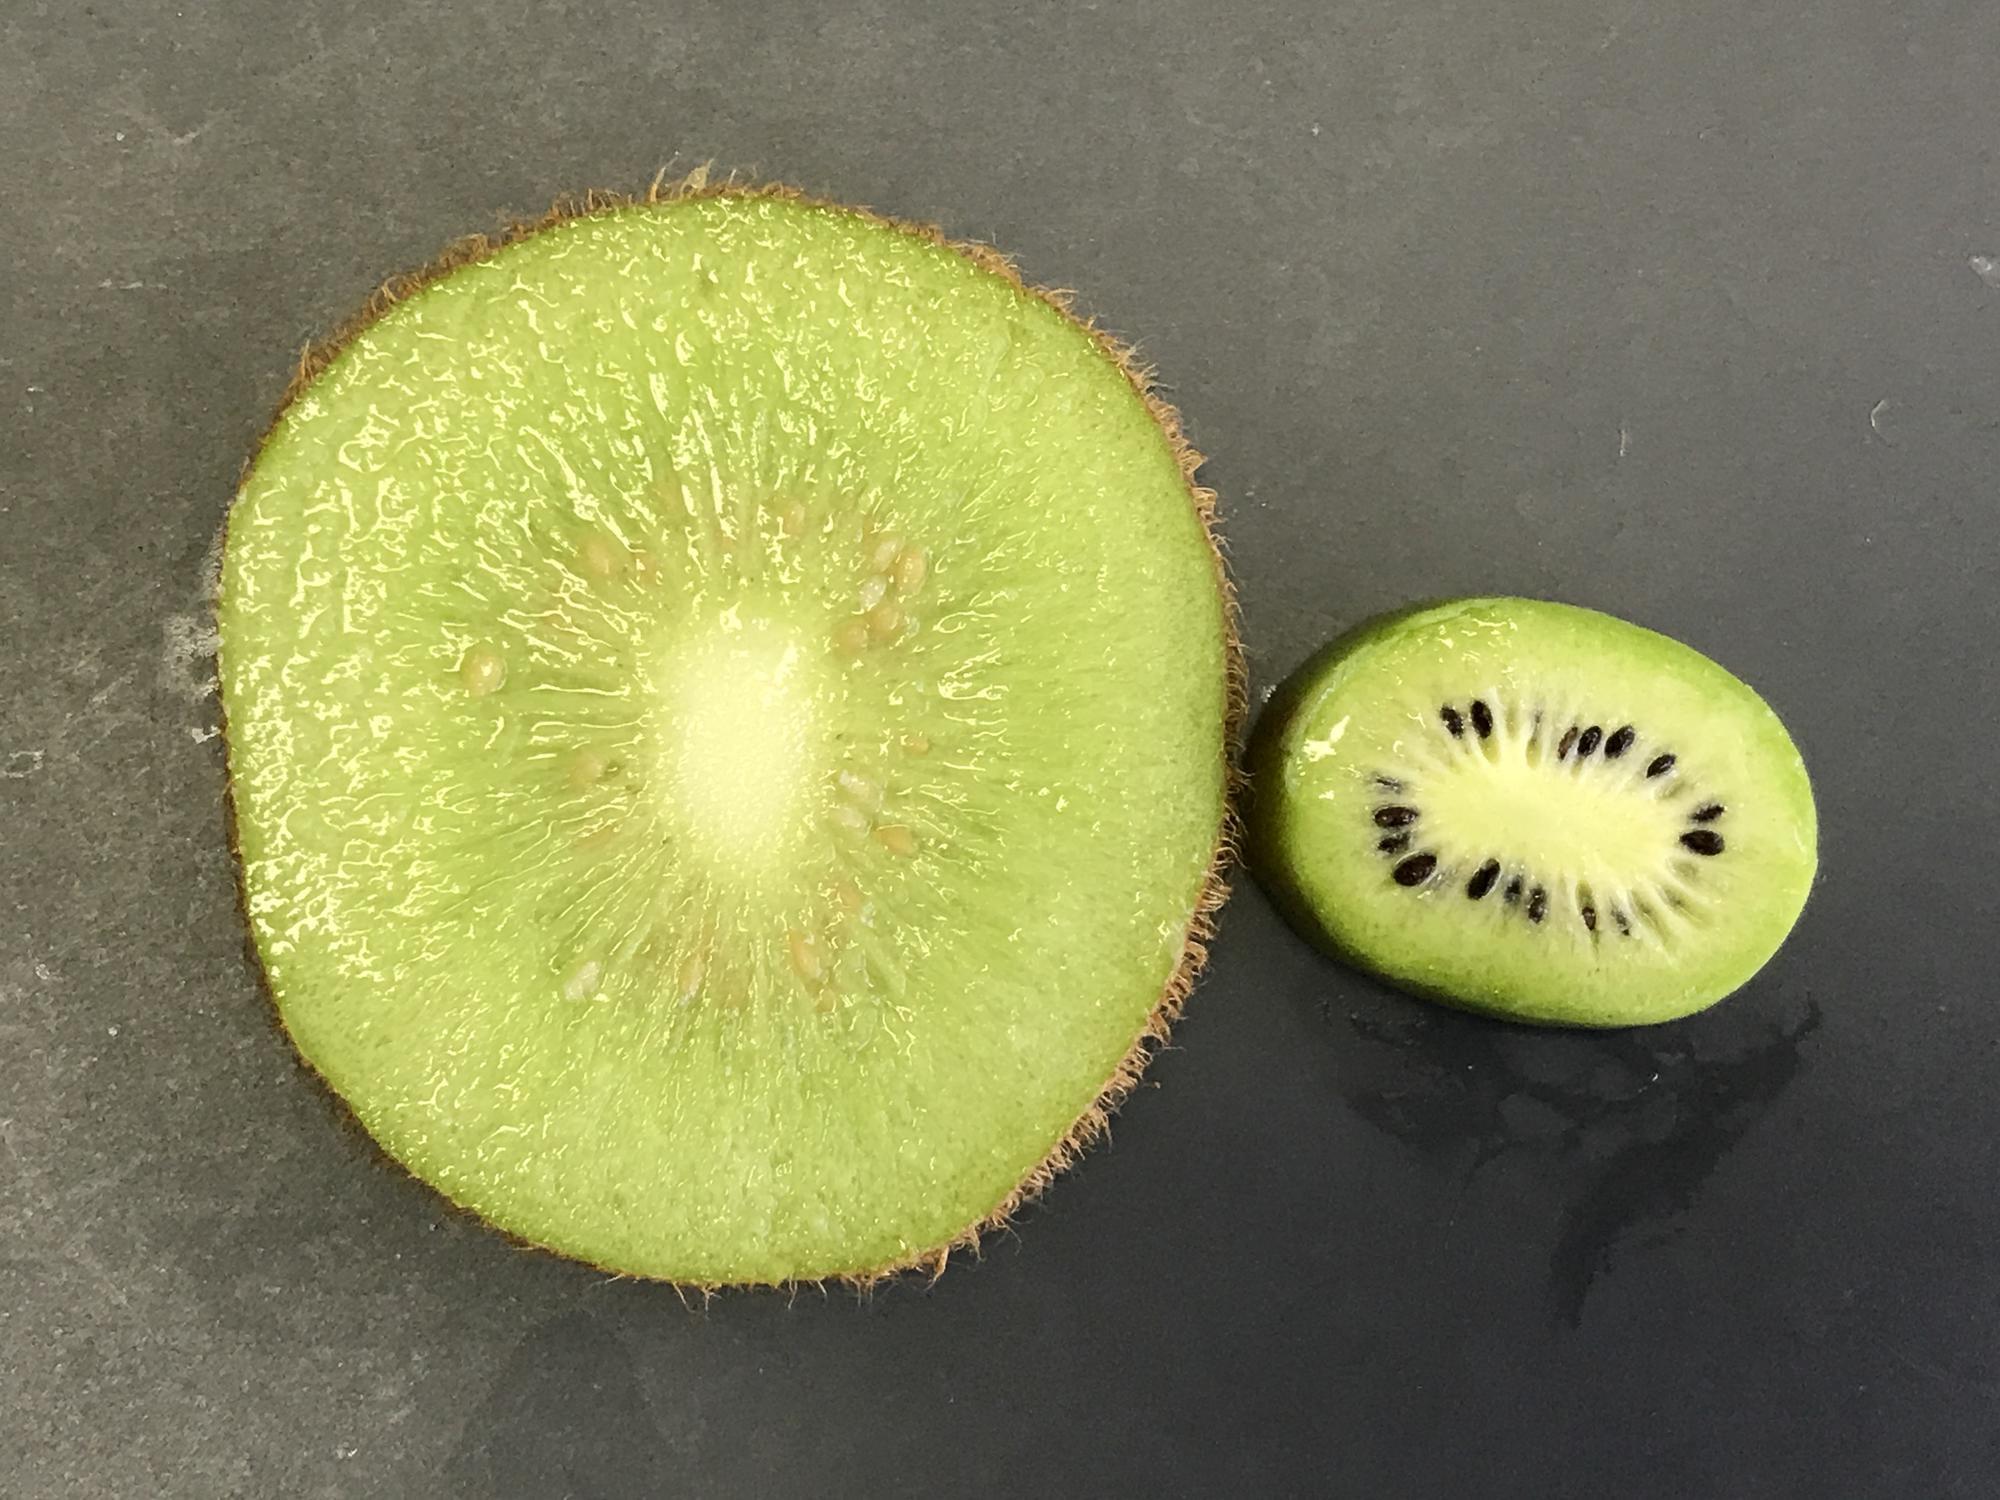
The kiwiberry is ripe and the fuzzy kiwi is not because the seeds are still light brown. In addition to black seeds, the sugars need to be high enough for fuzzy kiwifruit to ripen properly after picking. In adapted regions of western Oregon, pick ‘Hayward’ and other fuzzy kiwifruit cultivars as late as possible (late October/early November, or before the first hard frost) (Figure 13).
Avoid picking when fruit is wet from dew, fog or rain. Wet fruit will decay faster. Store dry fruit in paper bags or boxes in the refrigerator or a cold room. If fruit were picked at the proper stage and kept in a cold room, they can be stored for several months. Store them for about a month before ripening fruit at room temperature. Ripe kiwifruit contain 12% to 20% sugar and have a pH of 3.1–4.0; these are high-acid fruit.
Pruning and training
Kiwifruit plants are vigorous and require pruning to keep the vine to a manageable size. Since these are climbing vines, plants will climb onto any structure like a garage or house roof if not trained and pruned properly. Without good pruning, the excess wood left on a vine would potentially collapse an arbor. Pruning is time consuming but is well worth it for a consistent yield and optimum fruit size. Proper training in the establishment years is important to develop the permanent structure of the vine, so it can be more easily pruned properly each year.
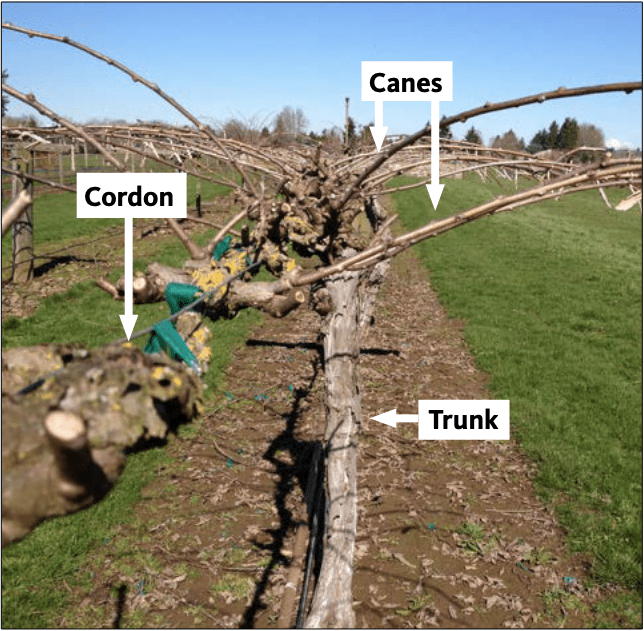
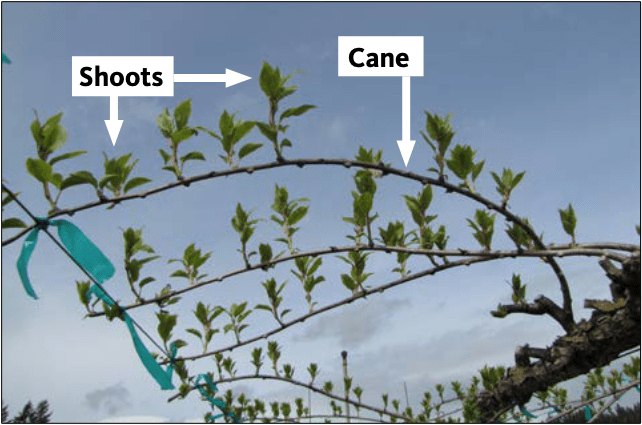
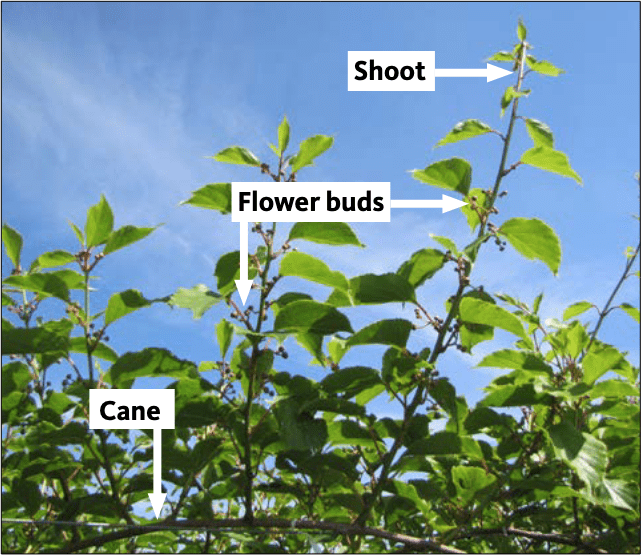
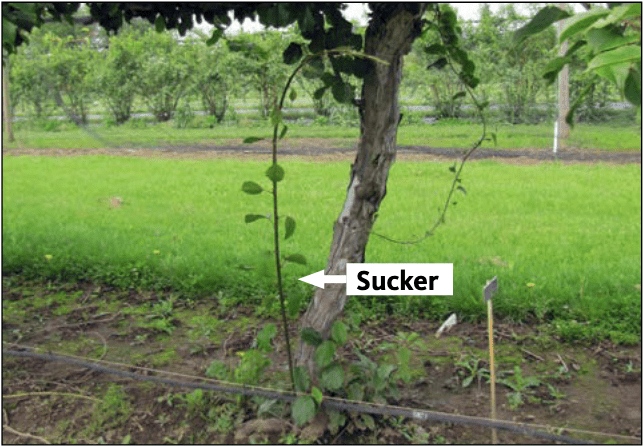
To prune well, it’s important to understand how kiwifruit plants grow and where the flower buds are produced. Once shoots lose their leaves in fall, they are called canes. They are then called “1-year-old” (Figure 19). These canes will contain one bud at each node (where leaves used to be). Many of the buds on these canes will be fruitful — they will produce a shoot next spring (Figure 20) that has flowers (Figure 21). In all kiwifruit, flowers are produced on shoots that grow from 1-year-old canes (last year’s growth). The buds at the base of these 1-year-old canes, nearest the cordon, are often vegetative. The shoot will not have any flowers next spring. New shoots can also grow from older wood like the trunk. These are always vegetative and are often called suckers (see “Summer pruning”).
Kiwifruit plants are much easier to train and prune when trained to a single trunk (Figure 19). While male and female vines are trained similarly during the establishment years, they are pruned at different times of the year. Prune male vines immediately after bloom (about late June in the Willamette Valley). Male vines are not pruned in winter because it would reduce the number of flowers, and the plant needs as many flowers as possible for good pollination.
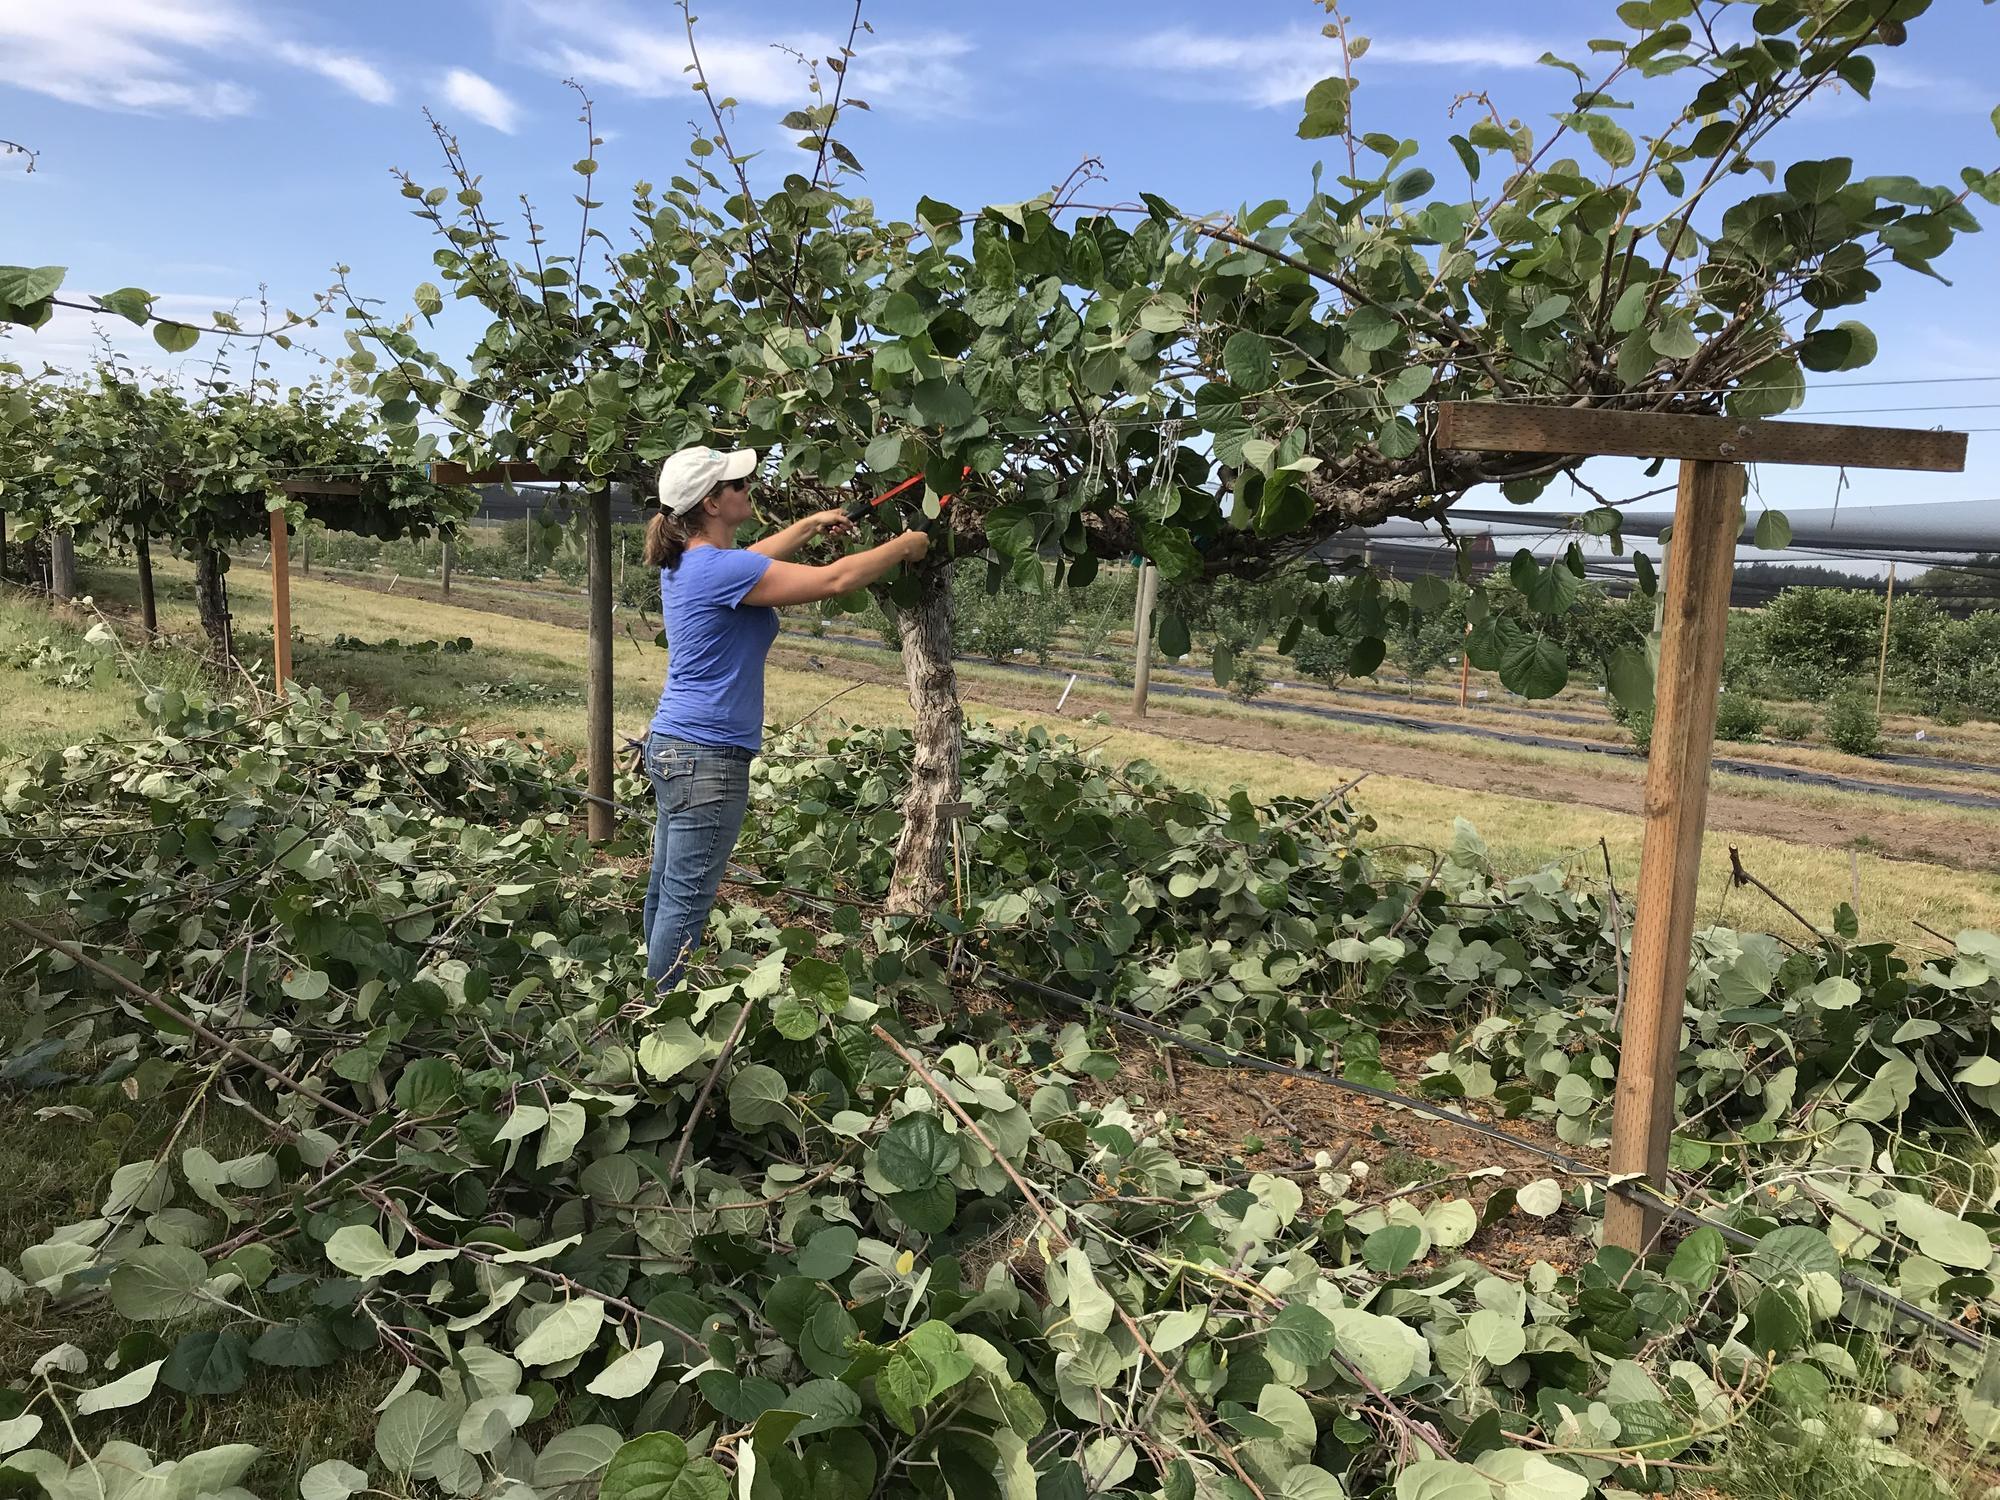
Prune female vines every winter. In the Willamette Valley and southwestern Oregon, prune female fuzzy and kiwiberry vines from December through January. If you prune later than this, the vines tend to drip a lot of sap from the pruning cuts because the vines have become active (Figure 22). In colder production regions such as Central, eastern and southeastern Oregon, female kiwiberry vines can be pruned from December through February.
For detailed explanations and video demonstrations of pruning and training methods from planting through maturity in female and male kiwifruit species, see the online course Pruning and Training Kiwifruit
Planting year
Prune and train male and female vines similarly in the planting and establishment years.
The most important goal in the planting year is to develop a single, straight trunk. Prune plants back to one or two buds (on 1-year-old wood) at planting (Figure 23A). If the nursery plants are already growing, prune back to a good, strong shoot that can be trained upright. On both types of plants, select a single, vigorous shoot to train upward as the trunk (Figures 23B and 24). Place a stake beside the shoot and tie your chosen shoot or future trunk to it. Don’t tie it too tightly or you could girdle the shoot; flexible tie tape is a good choice. Connect a string from the central trellis wire in a T-bar training system or the top of the arbor to the stake to help support the vine as it grows (Figure 9). The shoot should not wrap around the stake, so carefully unwrap it as it grows. This helps the vine develop a straight trunk.

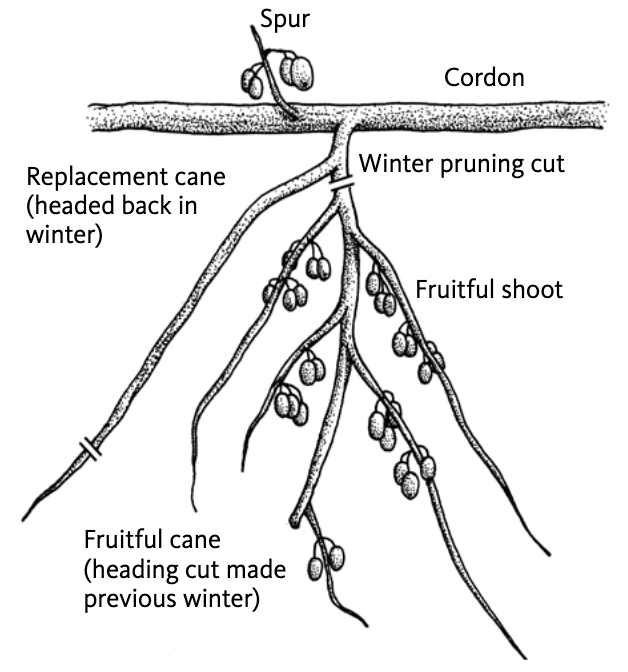
Kiwifruit are commonly trained to a bilateral cordon — two permanent structures, one in each direction from the top of the trunk (Figure 19). Fruiting canes and spurs (short 1-year-old canes) originate from the cordons and are left after pruning on female and male vines.
In the first winter, the pruning method depends on how much the trunk grew. If the trunk did not reach the full trellis or arbor height, prune the trunk back to about pencil width (¼ inch) in diameter or larger. In the next growing season, choose an upper shoot to continue the trunk growth and train it upwards. Remove any shoots that emerge from buds below this on the trunk.
Remove any new shoots that emerge at the base of the plant to direct the plant’s energy and growth into the trunk. If the trained shoot loses vigor early in the season or if it breaks, prune off the top of the shoot and train up a new leader from the uppermost branch that develops; remove any other branches that emerge below this (Figure 23C). If the growing shoot or trunk reaches the top wire or top of the arbor early enough in the season, you can gently tie it in one direction on the trellis wire or arbor.
Establishment years
In the second year, the goal is to continue to develop the two permanent cordons on each vine. Train the cordons in opposite directions from the trunk along the center wire or the edge of the arbor. Even if a cordon was established in the planting year, it is likely not long enough. Extend the length of the cordon by choosing a new leader shoot near the tip of the cane. Train this as it grows.
In the winter, prune the future cordons back to pencil width and plan to extend their length next season if needed (Figure 23E).
When the cordons are 1 year old (grew last year), they will produce shoots from many nodes. Keep shoots that are produced along the cordons at about 8-inch intervals; these will produce fruit. In an arbor, choose to keep shoots that are growing from the cordon toward the center of the arbor. Carefully tie these shoots to the trellis to reduce risk of the shoots breaking from wind. Remove the other shoots by breaking them off. In the winter, shorten these canes to fit the trellis wire (Figure 23F). These canes will produce fruiting shoots next year (Figure 26).
In each year, remove any suckers that grow from lower down on the trunk or at the base of the plant during the growing season (see “Summer pruning”). In general, pruning the following winter will involve techniques similar to those described below for mature vines.
If the trunk reached its needed height, prune back so that you can tie it to the top of the trellis or the wire (Figure 23D). In the next growing season, choose an upper shoot on each side of the trunk and train them along each side of the top of the arbor or each side of the central wire on a T-bar (Figure 25). Remove any other shoots that emerge from buds below this point.
If the trunk grew longer than needed last season, prune it back to about pencil width and tie it in one direction along the arbor or wire. This section will produce some fruit in the upcoming year. Choose an upper shoot on the other side of the trunk and train it in the other direction. Remove any other shoots that emerge from buds on the trunk below this point as soon as possible to direct the plant’s energy into the shoots being trained.

Mature vines
Good pruning of healthy, mature kiwifruit female and male plants typically involves removing about 70% to 90% of the wood that grew the prior season. Prune male and female vines at different times (Figure 27).

FEMALE VINES
Prune female vines each winter with a goal of leaving about 10 to 20 well-spaced canes growing from the cordons on each plant (five to 10 per side) (Figures 19 and 27). Shorten each cane by cutting it just beyond the outer trellis wire (generally just over 2 feet long) in a T-bar or to the center or edge of the arbor, depending on how the male vine is trained. Do not overlap the canes of male and female vines because this will make pruning the male vine difficult the following summer (see below). Tie the canes securely using flexible tie tape or bailer’s twine.
In most cases, replace last year’s fruiting cane with a new, 1-year-old cane. These usually will have developed at the base of the cane left after pruning last winter. Figure 28 shows typical growth from a 2-year-old cane (left after pruning the prior winter) and ideal pruning cuts for the upcoming winter. Sometimes new shoots grow directly from the cordon. Next winter, these will be good options for replacement fruiting canes, provided they are in a suitable location. Shorter spurs (6 inches or so in length) may also grow from the cordon (Figure 28); if you see these, leave them, as they are quite fruitful.
MALE VINES
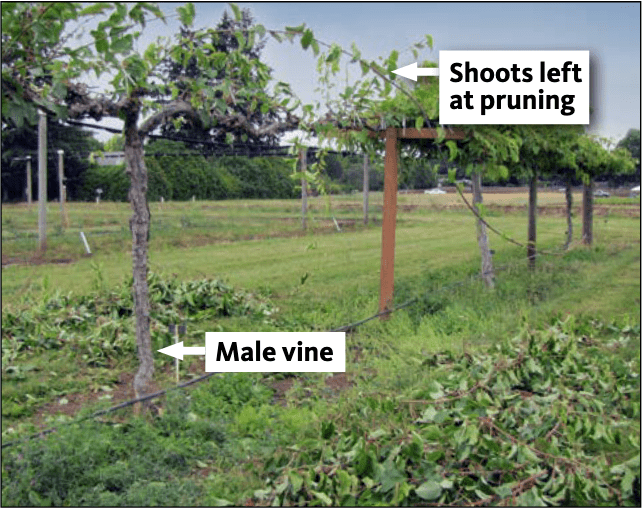
Do not prune male vines in winter (Figure 27). Instead, prune male vines immediately after bloom (in late June in the Willamette Valley). While it is more difficult to prune this time of year with so many shoots and leaves (Figure 29), they are pruned in a similar way to the female vines. The goal is to leave about 10 to 20 well-spaced shoots growing from the cordons on each plant (five to 10 per side) (Figure 30). Choose vigorous shoots that grow from or near the cordon. Do not prune or shorten these shoots. Tie them loosely to the outer T-bar wires of the arbor using flexible tie tape or bailer’s twine.
SUMMER PRUNING FEMALE AND MALE VINES
Remove suckers from the base of the vine throughout the growing season (Figure 31). If shoots growing from the cordon get too long and need to be managed to keep them out of the way, cut or hedge them up to 2 feet from the edge of the trellis. Be careful not to prune shoots too hard, because you will need some of these shoots to be your new fruiting canes next winter in female vines. Also, excessive shoot removal or hedging can lead to fruit sunburn (see “Common problems”).
It is natural for some kiwiberry shoots to stop growing during the growing season. Also, the tips of some shoots will die after bloom, resulting in a 3- to 6-inch black tip. This is not a disease.
Renovation
Kiwifruit vines of any species that have been left unpruned for a couple of years will quickly show poor shoot growth near the cordon. Female vines will be harder to pick because fruit are at the edges of the canopy. Fruit will also be small compared to the typical size for the cultivar. These unpruned vines can be heavy and can break a trellis or arbor.
If there are no good shoots to prune back to near the cordon, you can renovate or prune the vine extremely hard in the winter. Look for 1-year-old canes near the top of the trunk that are long enough to replace old cordons. Or look for some good 1-year-old canes coming off the existing cordons. Even if there are fewer than normal, you can prune the vine hard, leaving only these canes. If there are no good canes present, use a saw to cut the trunk near the top of the trellis or arbor. If the vine has multiple trunks and you want to change to a single trunk, cut a good trunk that is straight and in the proper location to a height near the top of the trellis. Cut any extra trunks off at the base of the plant. New shoots will grow from the old wood left after pruning. Choose those in proper locations and remove the extra ones; see “Planting year.”
If you want to build a new trellis you can use the same technique to cut off the trunk to a low height. Then build the new trellis and train a vigorous shoot to become the new trunk.
After renovating a vine, there will be no flowers or fruit the following year, unless some 1-year-old canes remained. However, because vines have a well-established root system, new shoot growth is rapid and yield increases quickly from that point on.
Common problems
Weather-related problems
Kiwifruit plants adapted to your region are cold hardy but may still be susceptible to frost damage to growing plant parts in late fall or late winter to early spring. Also, in some winters cold damage may occur when plants are not growing or are dormant.
WINTER COLD INJURY AND FROST DAMAGE
Kiwiberries are better adapted to this region because the vines are cold hardy when fully dormant — down to -10 to -25 °F for Actinidia arguta and -40 °F for Actinidia kolomikta. The fuzzy kiwifruit (Actinidia deliciosa) is only adapted to warmer regions of Oregon. It needs a growing season of 225 to 240 frost-free days and is cold hardy to about 0 to 10 °F, depending on when the cold event occurs and preceding temperatures. Choose a kiwifruit species or cultivar that is adapted to your hardiness zone (see “Cultivars”) to minimize risk.
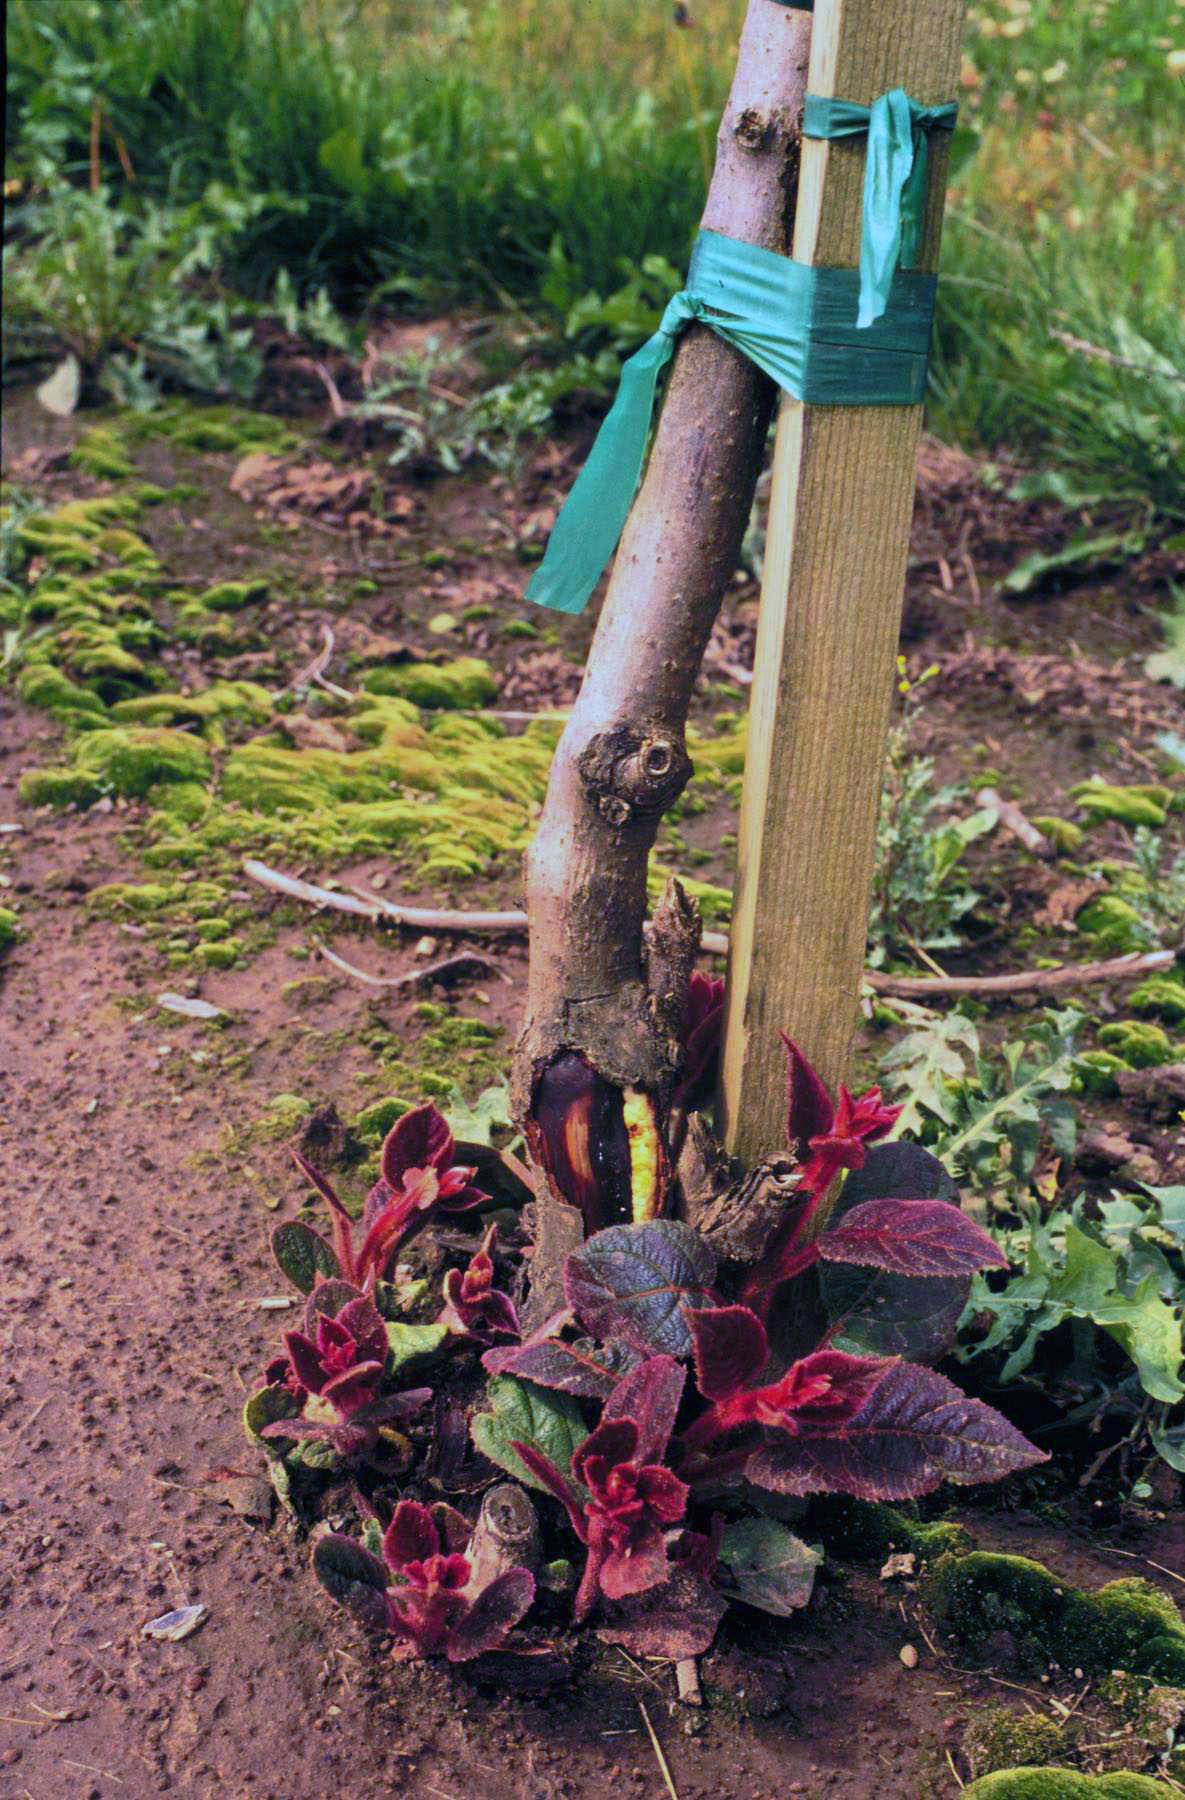
Damage to dormant vine tissue has only occurred in fuzzy kiwifruit in this region. Depending on the severity of the cold, the length of the cold period and temperatures preceding the cold spell, damage may occur to the trunk or the canes. When the trunk is damaged, suckers will emerge that can be used to replace the trunk (Figure 32). If the 1-year-old canes are damaged, yield will be reduced.
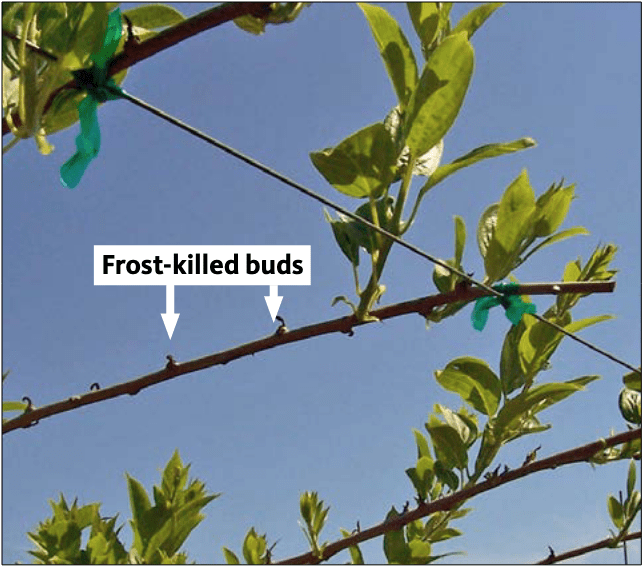
All kiwifruit types tend to break bud early in the season – as early as late February to early March in the Willamette Valley. These newly developing young shoots are sensitive to frost injury in all kiwifruit species. Temperatures of 30 °F or less for only 30 minutes can severely damage shoots. Since only one shoot can grow at each node, damage by frost will mean no fruit is produced at that node. However, typically only 25% to 50% of the total buds break initially in kiwifruit plants. This is likely because there are so many buds left even when pruning normally in these mature vines. If the young shoots that grew early are damaged by frost, buds that did not initially break will do so, compensating for the first frost event (Figure 33).
SUNBURN
The trunk of a young vine may be sensitive to sunburn in some areas. You can paint the trunks with a mixture of 1:1 water and interior white latex paint to help prevent sunburn to the trunk in Central, eastern or southeastern Oregon. Milk cartons, trunk wraps or grow tubes also can protect against sunburn and may provide added benefit against feeding damage from vertebrate pests like rabbits.
Frost will injure open flowers at 30 °F. While frost injury to flowers does not occur in the Willamette Valley because vines bloom in mid-June, frost can occur at any time of the growing season in some areas of Central and eastern Oregon. Frost injury will reduce yield.
You can protect kiwifruit plants at sensitive times by using a row cover (also called floating row cover, frost cloth or spun-bound covers). Place the row cover over the vine in midafternoon the day before a forecast frost event. Leave it on until after the cold spell has passed.
In western Oregon, remove a grow tube after the first hard frost in fall. Leaving grow tubes in winter can increase risk of cold injury because it gets too warm inside. In Central or eastern Oregon where winter sun scald can occur, leave the grow tube on until spring.
Kiwiberry fruit may be sunburned if suddenly exposed to intense sunlight or late in the season when sun is intense and humidity may be low (Figure 34).

WIND AND HAIL
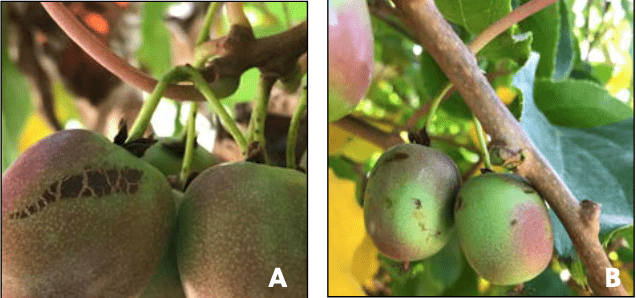
Wind can damage or break shoots at any time of the growing season. Wind may also aggravate rubbing of one fruit to another or a fruit against a shoot or leaf stem. Rubbing of fruit leads to scarring (Figure 35A and 35B). Hail events after fruit set can damage fruit, leading to scarring.
Malformed fruit
Generally, with a male and female vine blooming at the same time and good weather for pollinator activity, pollination and fruit set will be good. Poor pollination will cause fruit to have a groove or be much smaller than typical for the cultivar.
Weeds and weed management
Weeds compete with kiwifruit plants for water and nutrients. Keep an area about 4 feet from the trunk free of weeds by hoeing or hand-pulling. A mulch such as sawdust or bark may help control weeds (see “Mulching”).
For detailed information on specific weeds and weed control, refer to the PNW Weed Management Handbook.
Insect pests
The only insects observed to cause problems in kiwiberries in Oregon are thrips. High populations at bloom may cause scarring that looks like a scaly ladder running from the base of the fruit to the tip. Check with your local OSU Extension Service office for control recommendations if insects become a problem. Control methods are also outlined in the PNW Insect Management Handbook.
Diseases
ROOT ROT
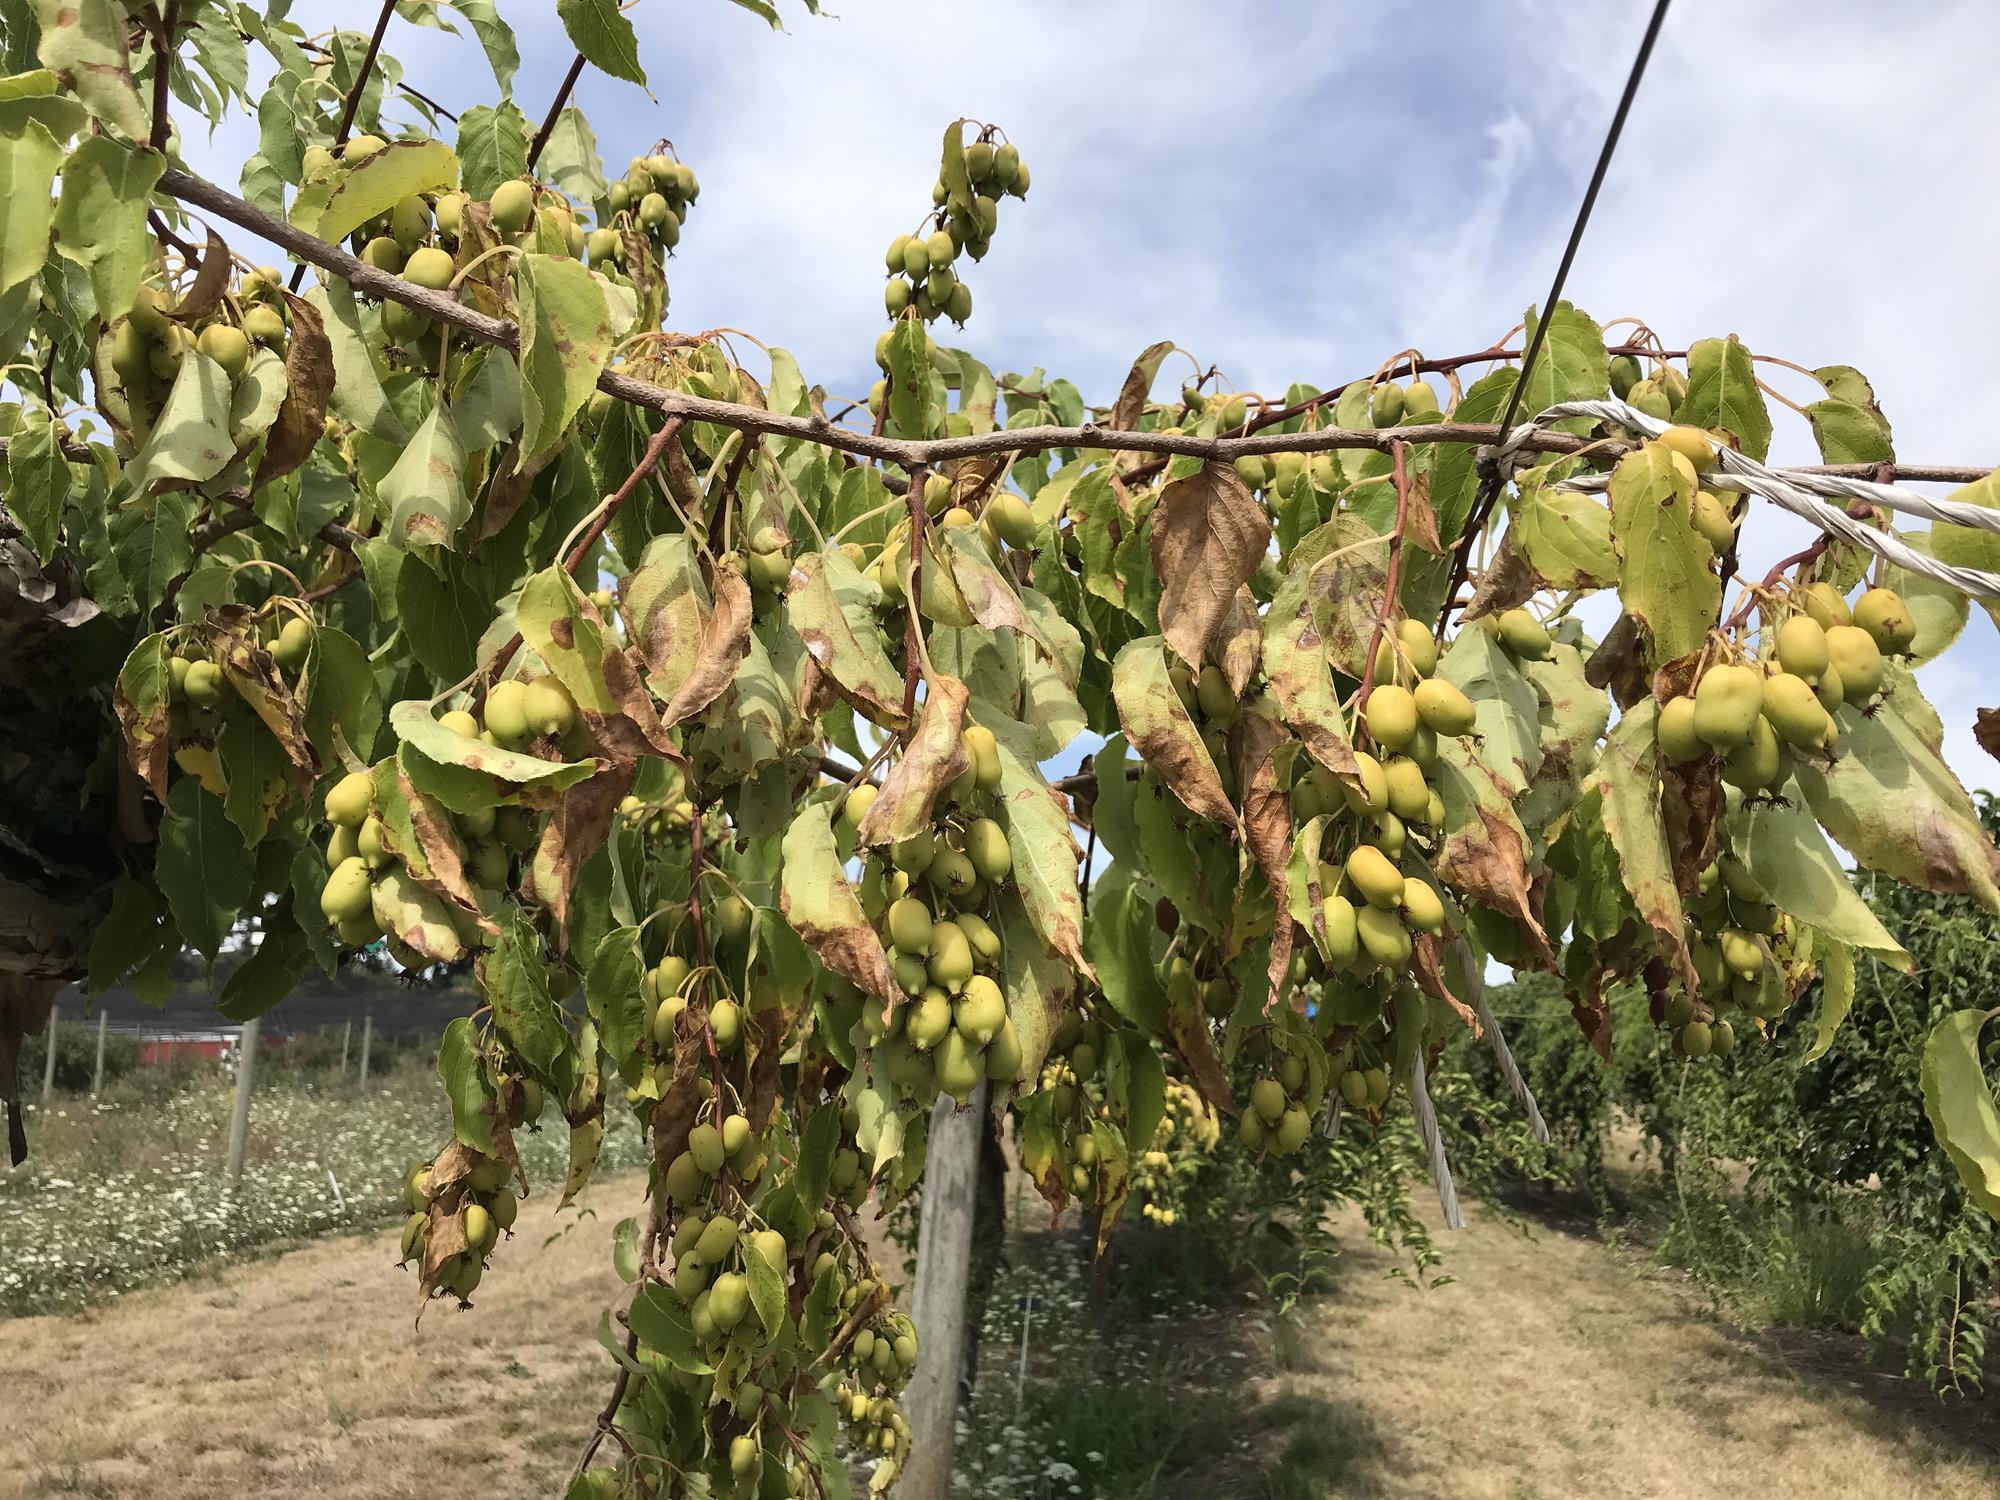
Phytophthora root rot, a soilborne disease, is aggravated in wet, heavy soil. Symptoms include leaves dying in midsummer, generally showing brown edges first (Figure 36). Shoots will then die. In a heavy infestation and in susceptible cultivars (see “Cultivars”), the vine may die. Plant in well-drained soil.
VERTICILLIUM WILT
Kiwifruit vines are susceptible to verticillium wilt, a soilborne fungus. Plants will start dying in late summer. There is no control for this fungal pest. Avoid planting kiwifruit in soil where other susceptible crops such as black raspberry, strawberry, tomatoes, peppers and some ornamental plants, among others, have grown in the last several years.
Few other diseases have been problematic in kiwifruit. If disease becomes an issue, check with your local OSU Extension Service office for control recommendations. The PNW Plant Disease Management Handbook also outlines control methods.
For more information
- Acidifying Soil for Blueberries and Ornamental Plants in the Yard and Garden, EC 1560
- Acidifying Soil in Landscapes and Gardens East of the Cascades, EC 1585
- Analytical Laboratories Serving Oregon, EM 8677
- Applying Lime to Raise Soil pH for Crop Production—Western Oregon, EM 9057
- Eastern Oregon Liming Guide, EM 9060
- Growing Berries on the Oregon Coast: An Overview, EM 9177
- Growing Berries on the Oregon Coast: Kiwifruit and Table Grapes, EM 9181
- Pacific Northwest Insect Management Handbook, Pacific Northwest Plant Disease Management Handbook, and Pacific Northwest Weed Management Handbook. Revised and reissued annually.
- Pruning and Training Kiwifruit
- A Guide to Collecting Soil Samples for Farms and Gardens, EC 628
- Soil Test Interpretation Guide, EM 8713

